seamus dubhghaill

Promoting Irish Culture and History from Little Rock, Arkansas, USA


Leave a comment

The Battle of Modder River

The Battle of Modder River is an engagement in the Second Boer War, fought at Modder River, on November 28, 1899. A British column that includes Irish units under Lord Methuen, that is attempting to relieve the besieged town of Kimberley, forces Boers under General Piet Cronjé to retreat to Magersfontein, but suffers heavy casualties altogether.

When the war breaks out, one of the Boers’ early targets is the diamond-mining centre of Kimberley, which stands not far from the point where the borders of the Boer republics of the Transvaal and the Orange Free State, and the British-controlled Cape Colony meet. Although their forces surround the town, they do not press home any immediate assault. Nor do they attempt to cross the Orange River on this front to invade Cape Colony.

Meanwhile, British reinforcements are on their way to South Africa. Their commander, General Sir Redvers Buller, detaches the 1st Division under Lieutenant General Lord Methuen to relieve the Siege of Kimberley. This decision is made partly for reasons of prestige, as the capture of Kimberley, which contains the famous Imperialist and former Prime Minister of Cape Colony, Cecil Rhodes, would be a major propaganda victory for the British.

During November, Methuen’s force advances north along the Western Cape Railway. They fight and win two engagements against Boers from the Orange Free State under General Prinsloo at the Battle of Belmont and at the Battle of Graspan. At least one American, Lance Corporal Hollon Bush of the 7th Company, First Battalion Coldstream Guards is present and wounded at the Battle of Modder River. His journey to enlist from departure in New Orleans to England is not without many pitfalls before beginning service at the Tower of London, then on to Gibraltar and South Africa.

Methuen’s force consists of two infantry brigades, the Guards Brigade under Major-General Sir Henry Edward Colville and the 9th Brigade under Major-General Reginald Pole-Carew, two mounted regiments, three batteries of field artillery (18th, 62nd and 75th) and four guns of the Naval Brigade. Further reinforcements are arriving up the railway.

The British cavalry (the 9th Queen’s Royal Lancers and a unit recruited in Cape Town, Rimington’s Guides) make some attempts to scout the ground ahead of the army but fail entirely to detect General Koos de la Rey‘s trenches and other preparations. For example, the Boers had whitewashed stones on the veld or had placed biscuit tins as range markers. At 4:30 a.m. on November 28, Methuen’s force rouses itself, deploys into line and begins advancing toward the Modder River, with no plans other than to cross the river before having breakfast on the far side.

As the British troops come within 1,200 yards of the river, Methuen remarks to Colville, “They’re not here.” Colville replies, “They’re sitting uncommonly tight if they are.” At this point the Boers open fire. Most of the British troops are forced to throw themselves flat. Some try to advance in short rushes but can find no cover on the veld. Few British troops get closer than 1,000 yards to the Boers. The Guards try to outflank the Boer left but are unable to ford the Riet River. The British guns pound the buildings near Modder River Station and the line of poplar trees which mark the north bank of the Modder River, and entirely miss the enemy trenches on the south bank. Meanwhile, the Boer guns maintain a galling fire and are kept in action by repeatedly moving their positions.

The battle becomes a day-long stalemate. Most of the British infantry lay prone on the veld, tortured by heat and thirst, but safe from enemy fire unless they move. Many stoically smoke pipes or even sleep. Methuen gallops about the field trying to renew the advance and is himself wounded. At midday, some of Pole-Carew’s 9th Brigade find the open Boer right flank at Rosmead drift (ford) downstream. British infantry infiltrates across the ford and at about 1:00 p.m. drives the Boers out of Rosmead. The attack is disjointed and suffers casualties when a British field artillery battery which had just arrived on the field shells them by mistake. By nightfall, De la Rey has driven them back into a small insecure bridgehead.

Nevertheless, the Boers fear that they are now vulnerable to being outflanked and withdraw during the night.

Methuen reports that the battle had been “one of the hardest and most trying fights in the annals of the British army.” Although casualties are not cripplingly heavy (between 450 and 480), mainly because the Boers opened fire prematurely, it is clear that any simple frontal attack by infantry only against an enemy using bolt action rifles, is effectively impossible. The British are forced to pause for ten days, to evacuate their casualties, receive further reinforcements and repair their lines of communications. The delay allows the Boers to construct the entrenchments which they are to defend in the Battle of Magersfontein.

On the Boer side, there are about 80 casualties, including, Adriaan, the eldest son of Koos de la Rey, mortally wounded by a shell.

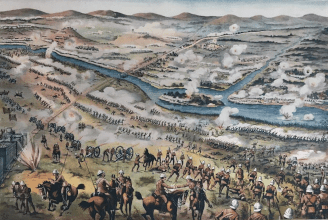
(Pictured: An illustration of the Battle of Modder River during the Second Boer War. This illustration is more dramatic than the actual battle, and is meant to amplify the British side of the war, Bacon’s South Africa War Prints, G. W. Bacon & Co. London)


Leave a comment

The Scramoge Ambush

The Scramoge ambush is an ambush carried out by the Irish Republican Army (IRA) on March 23, 1921, during the Irish War of Independence (1919-21). The IRA ambush a lorry carrying British Army troops and Royal Irish Constabulary (RIC) officers at Scramoge (also spelled Scramogue), near Strokestown in County Roscommon. Three British soldiers and an RIC officer are killed, while two RIC “Black and Tans” are captured and shot dead shortly thereafter.

Following the ambush, the British carry out a sweep in which they capture three of the IRA volunteers involved and kill another who had not taken part.

County Roscommon is not one of the more violent areas of Ireland during the conflict. The local IRA argues to their GHQ that it is very difficult to conduct guerrilla warfare in the flat open countryside there. Prior to the action at Scramogue, the biggest previous incident had been in October 1920, when four RIC officers were killed in an ambush near Ballinderry.

Sean Connolly is sent by IRA GHQ from Longford to re-organise the Roscommon IRA and chooses the ambush site at Scramoge. However, he is killed twelve days before the action, at the Selton Hill ambush in neighbouring County Leitrim.

Both the North and South Roscommon brigades of the IRA take part and are commanded by Patrick Madden. There are 39 volunteers in the flying column, but only 14 take part in the actual attack. The remainder are tasked with blocking roads to keep the IRA’s line of retreat open. The IRA party is armed with thirteen rifles (eleven Lee–Enfields, one Winchester and one sporting rifle), twenty shotguns (though some are in bad condition) and two or three Webley revolvers. This is the largest collection of arms that the IRA assembles in Roscommon during the war and some of them have been borrowed from IRA units in Longford.

Among the volunteers who take part are Martin Fallon, ‘Cushy’ Hughes, Frank Simons, Luke Duffy, Peter Casey, Peter Collins, Patrick Gallagher and Tom Compton. Several of the IRA men, including Hughes, had served in the Irish Guards (IG) in World War I, but had been persuaded by Pat Madden to join the IRA upon their return.

The ambush site is carefully prepared. It is located at a sharp bend on the Strokestown–Longford road. A farmhouse and barn at the bend have been taken over and loopholed, and a trench is dug behind a hedge alongside the road. Only a mile from the IRA’s position, the British 9th Queen’s Royal Lancers regiment is garrisoned in Strokestown House.

The IRA waits in their position all day for British forces to come from Strokestown. Just as a troop lorry finally appears, two civilians came up the road in a pony and trap and have to be frantically waved out of the way.

The lorry carries a nine-man British Army and Royal Irish Constabulary (RIC) patrol traveling on the Strokestown–Longford road. The British inquiry into the incident is to question why the lorry is unescorted, as their practice is not to travel in lone vehicles.

The IRA opens fire from very close range, killing the driver and halting the lorry in its tracks. Several of the soldiers and policemen are hit and they scrambled for cover behind a wall along the road. The lorry has a Hotchkiss machine gun bolted onto it, but its gunner gets off only one burst before being badly wounded and the gun is put out of action. The commander of the patrol, Captain Roger Grenville Peek, is hit in the lorry but tries to run to safety, only to be hit again and killed 400 yards down the road. The other officer with the party, Lieutenant Tennant, is also killed by a shotgun blast. After the death of the two officers, the surviving British, several of whom are wounded, surrender.

Just as the firing is dying down, another lorry, an RIC/Black and Tan patrol, approaches the ambush site but turns back after coming under fire.

Four of the British force are killed – this includes two British Army officers (Roger Grenville Peek and John Harold Anthony Tennant), a Royal Army Service Corps (RASC) driver, and one RIC man (Constable Edward Leslie).

Two men in civilian clothes are also found in the lorry. They turn out to be Black and Tans, Constable Buchanan and Constable Evans, who had been placed under arrest by the soldiers. They are made prisoners by the IRA. The ambush party takes the British arms, including the Hotchkiss gun, burn the lorry and make their escape over the hill of Slieve Bawn.

The IRA leaders, Pat Madden, Luke Duffy and Frank Simons, decide to murder the two Black and Tans, despite their offering to show the IRA how to use the captured machine gun. The IRA officers’ reason that if the prisoners identify the IRA men who had taken part in the ambush, the volunteers will be at risk of being executed if captured. The two are taken to remote locations and shot over the next two days.

The British garrison in Roscommon town mounts a sweep directly after the ambush with eight lorries and one Whippet tank. Three volunteers who had taken part are arrested afterward. Pat Mullooly and Brian Nagle of the North Roscommon Brigade are arrested as they try to get away from the scene of the ambush, as is “Cushy” Hughes, who is picked up when he is drawing his soldier’s pension in Roscommon. Mullooly and Nagle are badly beaten by their captors on the road to Roscommon. The next day, another volunteer, Michael Mullooly, brother of Pat Mullooly, is shot dead in his home by the RIC.