seamus dubhghaill

Promoting Irish Culture and History from Little Rock, Arkansas, USA


Leave a comment

The Second Siege of Athlone

Godert de Ginkel, the commanding general of William III‘s army, begins a ten-day siege of Athlone on June 20, 1691. Athlone is besieged twice during the Williamite War in Ireland (1689–91). The town is situated in the centre of Ireland on the River Shannon and commands the bridge crossing the river into the Jacobite-held province of Connacht. For this reason, it is of key strategic importance.

The army of William III first besieges Athlone in 1690, shortly after their defeat of the main Jacobite army at the Battle of the Boyne. James Douglas and about 7,500 troops attempt to take the town, but the Jacobite garrison’s commander, Colonel Richard Grace, refuses to surrender. Lacking siege artillery, Douglas is forced to withdraw after a week.

In the summer of the following year, the Williamite army, having regrouped at Mullingar under the command of Dutch general Godert de Ginkel, marches via Ballymore to make a second attempt on Athlone.

The Jacobite commander, Charles Chalmot de Saint-Ruhe, marches his main field army from its winter quarters in Limerick to meet the threat. He draws up his force to the west of the town. Other Jacobite troops man fortifications in the ruins of the “English Town,” the eastern half of Athlone, along with a garrison in the “Irish Town” on the western bank. This arrangement is intended to allow the Jacobites to fight a staggered, drawn-out defence, though the advantage is reduced by high ground on the Leinster bank of the Shannon and the fact that the river is running exceptionally low at the time.

Jacobite defences are also hampered by disagreements between James’s Viceroy, Richard Talbot, 1st Earl of Tyrconnell, Saint-Ruhe, and Jacobite general Patrick Sarsfield. When Talbot asserts his seniority and offers advice on the defences to Saint-Ruhe, the latter refuses to recognise Talbot’s command, while Sarsfield sends him a message that his pavilion ropes will be cut if he does not leave immediately. Though Talbot surmises that a large number of the best Jacobite troops will side with him, he chooses to depart for Limerick rather than split the army.

Ginkel opens an assault on the eastern part of Athlone on June 20, which causes the Jacobites to retreat to the west bank of the river, dismantling the bridge in the process. Colonel Grace, who had been superseded as garrison commander by the French officer d’Usson, is killed in a bombardment at the western end of the bridge on the same day.

The Jacobite forces in the western half of Athlone, led by Major-General Thomas Maxwell, a Scottish Catholic, initially hold off the Williamite assault. There is fierce fighting centred on the bridge over the Shannon. The Williamites try to lay planks over the partially wrecked structure, which the Irish Jacobite troops manage to destroy despite coming under intense fire. One such Jacobite sortie, by a small group of volunteers from Maxwell’s dragoon regiment led by a Sergeant Custume or Costy, all of whom are killed, later passes into Irish folklore as an example of bravery. Several attempts by the Williamites to storm the bridge are repulsed with heavy losses.

The Williamite bombardment of the western, Connacht, side of the town is intense, with over 12,000 cannonballs and 600 bombs or mortars fired into the town. John Stevens, serving in the Grand Prior’s Regiment, records that “with the balls and bombs flying so thick, that spot was hell on earth.” During the ten-day bombardment, 32 heavy cannon and mortars fire one shot every minute. Athlone suffers the heaviest bombardment of any city in Britain and Ireland up to this point.

While developing a plan to storm the bridge, Ginkel identifies another potential crossing point at a ford to the south. To test the crossing, on the morning of June 29 he orders a Danish quartermaster and two privates, under sentence of death for cowardice, to ford the river while troops fire over their heads to give the impression they are deserting. All three ford to the western bank and return safely, whereupon Ginkel sends a force of grenadiers, 2,000 strong, to cross there and attack the Jacobite positions from the rear.

Following an argument between Saint-Ruhe and the garrison commander d’Usson, the fortifications on the western side of the city have not been levelled, as Talbot had suggested some days earlier. Saint-Ruhe does not issue an order to demolish them until June 29, apparently believing it impossible that a city could be taken with a relieving army so close by. They remain standing a day later, and a party of Ginkel’s grenadiers hurry to occupy them and raise the drawbridge there, holding off counterattacks from Saint-Ruhe’s army until the main Williamite force can be brought up. Saint-Ruhe detaches two brigades under Major-General John Hamilton to dislodge the Williamites, but after approximately an hour and a half of intense fighting, the Jacobites retreat.

The breakthrough of the Williamites forces the remains of the Jacobite garrison, who have been awaiting reinforcement from the main Jacobite force under Saint-Ruhe, to hastily abandon their positions in Athlone. Maxwell is captured. Accusations of treachery are later levelled at him, partly as he had been a supporter of Talbot’s faction. Saint-Ruhe withdraws into County Galway, passing through Ballinasloe. The Jacobites lose around 1,000 men at Athlone, though the highest estimates suggest losses of over 2,000, including colonels McGuinness, McMahon and O’Gara, in addition to Grace.

Ginkel continues to march toward Limerick, unaware of the position of Saint-Ruhe. On the morning of July 12, the Williamites are confronted by the main Jacobite army drawn up in a strong defensive position at Aughrim. In the ensuing Battle of Aughrim, Ginkel inflicts a crushing defeat on them, effectively ending Jacobite resistance in Ireland.

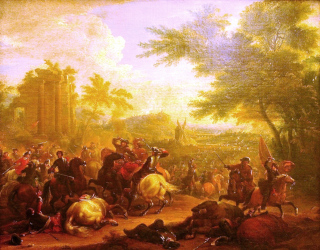
(Pictured: The powerful Williamites army attack, illustration by Victor Ambrus)


1 Comment

Irish Regiments Fight with Spain in the Battle of Villaviciosa

Three Irish regiments in the service of Spain fight in the Battle of Villaviciosa on December 10, 1710, during the War of the Spanish Succession. The regiments are commanded by Colonel Don Demetrio MacAuliffe, Colonel Don John de Comerford, and Colonel Don Reynaldo Mac Donnell. This last becomes known as the Hibernia Regiment.

The Battle of Villaviciosa is a battle between a Franco-Spanish army led by Louis Joseph, Duke of Vendôme, and Philip V of Spain and a Habsburg-allied army commanded by Austrian Guido Starhemberg. The battle takes place one day after a Franco-Spanish victory at Brihuega against a British army under James Stanhope, 1st Earl Stanhope. Both Philip V of Spain and the Archduke Charles of Austria claim victory, but the number of dead and wounded, the number of artillery and other weapons abandoned by the Allied army and the battle’s strategic consequences for the war confirm victory for Philip.

The battle is largely determined by the Spanish dragoons commanded by the Marquis of Valdecañas and the Count of Aguilar, which far exceeds the opposing forces. The Austrian forces retreat, pursued by Spanish cavalry, and the allied army is reduced to 6,000 or 7,000 men when it reaches Barcelona, one of the few places in Spain still recognizing Charles’ authority, on January 6.

After victories in the Battle of Almenar on July 27 and the Battle of Saragossa on August 20, the Habsburg allies supporting Archduke Charles capture Madrid for the second time and Charles enters Madrid on September 21. The 1710 invasion is a repetition of the one in 1706, and the 23,000-strong allied army is reduced at Almenara and Saragossa and in skirmishes with the Spanish-Bourbon militia. The allied troops are unable to maintain an occupation.

The allied position in Madrid is dangerous. On November 9, the city is evacuated and the retreat to Catalonia begins, pursued by Spanish cavalry led by the Marquis of Valdecañas. The archduke leaves the army with 2,000 cavalry and rushes back to Barcelona, while the rest of the army marches in two detachments. Austrian general Starhemberg and the main body of 12,000 men are a day’s march ahead of the 5,000 British troops under Lord Stanhope. The British force, surprised, is defeated at Brihuega on December 9, 1710. The British are taken prisoner, including Stanhope, who finally surrenders.

When General Starhemberg is informed of the attack on the British column, he moves his troops to help Stanhope’s army, unaware that the latter had capitulated. The next morning, December 10, the Franco-Spanish army is waiting on the plain of Villaviciosa. Compared to the Austrian general’s 14,000 troops, the Duke of Vendôme deploys about 20,000 men, including King Philip and other troops who had joined the duke that morning. The armies deploy in two lines on parallel ridges.

The battle begins during the afternoon, lasting until midnight. Each army has 23 pieces of artillery, deployed in three batteries. The artillery fire begins simultaneously, damaging both armies. The Marquis de Valdecañas, commanding the cavalry in the Bourbon right wing, begins the attack. Valdecañas sends his cavalry against the allied left wing, composed of German infantry and Portuguese and Spanish cavalry under Imperial General von Frankenberg. The German infantry and Portuguese cavalry try to stop the Bourbon charge before yielding, and the left wing is destroyed. The Spanish capture the artillery pieces, killing the Anglo-Dutch troops sent to aid the left wing. With the allied left wing defeated, the archduke’s infantry advances toward the Franco-Spanish center and drives back the Bourbon infantry. The Marquis of Toy tries to prevent losses in the center and avoid the division of the army, but most of his men are taken prisoner by the Portuguese.

Although the Bourbons in the center are in difficulty, the Count of Aguilar throws his cavalry against the archduke’s right wing, commanded by General Starhemberg and comprising the best grenadiers and cavalry squadrons of the allied army. The allies are unable to stop the Count of Aguilar’s cavalry. The archduke’s right wing is saved from disaster by support from the center, led by the Spanish general Antoni de Villarroel. Starhemberg regroups his forces, repulses the Count of Aguilar’s cavalry and charges the Bourbon left wing. After capturing the left-wing cannons, Starhemberg launches his army against the center.

The Bourbon center and left wing begin to retreat, and the right-wing cavalry pursues the allied left wing. The Count of Aguilar then attacks against the archduke’s right wing with his dragoons. Although the German and Portuguese cavalry, under Pedro Manuel de Ataíde, 5th Count of Atalaya, resist the first charge, Aguilar’s cavalry breaks the allied right wing. Valdecañas’ cavalry also deals a severe blow to the allied army, and Lt. Gen. Mahony and Field Marshal Amezaga’s troops charge from the right wing. Starhemberg in return launches three cavalry charges against them. During the fighting, Amezaga is wounded in the face. Starhemberg’s forces retreat to a nearby forest to escape the Franco-Spanish cavalry, and the allied forces begin their withdrawal under cover of night. The British regiments suffer heavy losses. Brigadier-General Lepell, the senior British officer, reports two regiments have been cut off while over 107 men are missing from his own and he has only two squadrons still available.

Although Philip V of Spain and the Archduke Charles both claim victory, the number of dead and wounded, the weapons abandoned by the allied army, and the strategic consequences in the war confirm French domination.

Starhemberg continues his retreat, harassed by Spanish cavalry. His army is reduced to 6,000 or 7,000 men by the time he reaches Barcelona. The Spanish throne is finally secured for Philip when Charles leaves Spain in April 1711 to become Holy Roman Emperor after the death of his older brother.

(Pictured: “Battle of Villaviciosa, December 10, 1710,” oil on canvas by Jean Alaux, Museum of the History of France)


Leave a comment

The Battle of Cassano

battle-of-cassano

Units of the Irish Brigade of France fight at the Battle of Cassano on August 16, 1705, during the War of the Spanish Succession. The battle is fought at the town of Cassano d’Adda, in Lombardy, Italy, between a French army commanded by Louis Joseph, Duke of Vendôme and an Imperial army under Prince Eugene of Savoy.

By August 1705, the French occupy most of Savoy, with the exception of Turin. In order to relieve the pressure, Prince Eugene tries to cross the river Adda at Cassano and threaten Milan. Although the French are taken by surprise, they manage to hold the bridge after six hours of intense conflict, both sides suffering heavy casualties.

The deep and fast-flowing river Adda has limited crossing points, especially for large bodies of men. The town of Cassano is on the right bank, with a stone bridge protected by a small fortification or redoubt. The area is also divided by numerous small streams and irrigation channels, the most significant being the Retorto, an irrigation canal running parallel to the Adda. This is connected to the left bank by another bridge, protected by another strongpoint.

Assuming Prince Eugene is still heading for Mantua, Vendôme orders his brother Philippe to leave his positions around Cassano and intercept him. In fact, the Imperial troops had marched overnight from Romanengo and are approaching the town when spotted by one of Vendôme’s cavalry patrols early the next morning. Realising their intentions, Vendôme heads to Cassano, along with approximately 2,000 reinforcements.

On arrival, he finds Philippe’s troops unprepared and in an extremely dangerous position, the bulk of their force caught between the Retorto canal and the Adda, and the main bridge blocked by their transport. Vendôme orders the baggage thrown into the river and forms a line running from the Retorto on the left, his centre around the main bridge, and his extreme right resting on the road leading to the nearby village of Rivolta d’Adda. Armand St. Hilaire, the French artillery commander, positions his guns inside the town, allowing him to fire directly on the bridge.

Around 2:00 in the afternoon, Austrian grenadiers attack the French positions around the Retorto. They initially succeed in capturing the bridge before being repulsed by St. Hilaire’s guns and a counterattack. Vendôme sends four regiments of the French Irish Brigade to reinforce his left, but after a fierce struggle, the Imperialists capture the canal’s sluice gates. After these are closed, the water level in the canal is lowered enough for men to wade across it.

Prince Eugene orders Leopold I, Prince of Anhalt-Dessau, and his Prussians into the canal to assault the French left. They manage to seize the further bank but suffer heavily in doing so. The battle surges back and forth across the river for several hours, in the course of which Vendôme has his horse killed under him, while Prince Eugene is wounded twice and has to leave the field. The fighting lasts another four to five hours, until ended by sheer exhaustion, with the opposing forces back at their starting positions.

The battle is inconclusive. While the French prevent the Imperialists crossing the Adda, Prince Eugene succeeds in delaying an assault on Turin until June 1706. Combined with having to transfer forces to Northern France following their defeat at Ramillies in May 1706, the French siege is broken in September, and fighting in Northern Italy ends in March 1707.

(Pictured: The battle of Cassano 1705 (War of the Spanish Succession), painted by Jean Baptiste Martin (1659-1735). Oil on canvas, Heeresgeschichtliches Museum, Vienna, Austria)


Leave a comment

The Battle of the Hill of Tara

battle-of-tara-hillThe Battle of the Hill of Tara is fought on the evening of May 26, 1798 between British forces and Irish rebels involved in the Irish Rebellion of 1798, resulting in a heavy defeat for the rebels and the end of the rebellion in County Meath.

Following the outbreak of the rebellion, signaled in Meath by the prearranged signal of the ceasing of a mail coach near Turvey hill, road blocks are posted on the Navan road. Members of the Society of United Irishmen and rebels in Meath begin to assemble at the Hill of Tara. Tara is chosen as it provides strategic control of road access to the capital of Dublin and cultural significance as the former seat of the High Kings of Ireland. Between 4,000-7,000 rebels gather at the hill. Following the outbreak of the rebellion on May 23, there are incidents of violent encounters throughout the countryside as rallying rebels make their way to Tara.

Picking up yeomanry reinforcements along the way, the combined fencible, yeoman and militia force forms up at the bottom of the hill in advance of the attack on the rebels who have established a large camp on the hill. The lack of any cannon or cavalry places the rebels at a great disadvantage despite their numbers. Disciplined volley fire and flanking cavalry action combined with withering grapeshot delivered from a 6 pounder cannon drive the rebels to within the graveyard walls at the summit. There, at dusk, the rebels make their last stand on the hill until a final grenadier assault finishes them.

The loss to the fencibles, yeomen and militia is minimal. However rebel casualties have estimates running from several hundred to several thousand dead and many wounded. Many bodies are removed during the night of the 26th and 350 dead are counted still lying on the battlefield the following day. Witnesses to the burial recollect many more bodies of those rebels who died of their wounds during the night being collected from the surrounding countryside in carts. It is noted by the witnesses that the bodies are universally disembowelled by the victors. The dead are buried in a mass grave marked by the Lia Fáil stone which is moved to mark the burial site. The defeat effectively ends the United Irishmen’s rising in Meath.

(Pictured: The high cross at the site of the Battle of the Hill of Tara, County Meath)


Leave a comment

The Siege of Limerick

cittie-of-limerick

Siege of Limerick commences on August 9, 1690, when William of Orange and his army of 25,000 men reach Limerick and occupy Ireton’s fort and Cromwell’s fort outside the city. His siege cannons are still making their way from Dublin with a light escort so all he has available is his field artillery. The siege train is intercepted by Patrick Sarsfield’s cavalry at Ballyneety in County Limerick and destroyed, along with the Williamites‘ siege guns and ammunition. This forces William to wait another ten days before he can start bombarding Limerick in earnest while another siege train is brought up from Waterford.

By this time, it is late August. Winter is approaching and William wants to finish the war in Ireland so he can return to the Netherlands and proceed with the main business of the War of the Grand Alliance against the French. For this reason, he decides on an all-out assault on Limerick.

His siege guns blast a breach in the walls of the “Irish town” section of the city and William launches his assault on August 27. The breach is stormed by Danish grenadiers, but the Jacobite’s French officer Boisseleau has built an earthwork or coupure inside the walls and has erected barricades in the streets, impeding the attackers. The Danish grenadiers, and the eight regiments who follow them into the breach, suffer terribly from musketry and cannon fire at point blank range. Jacobite soldiers without arms and the civilian population, including women, line the walls and throw stones and bottles at the attackers. A regiment of Jacobite dragoons also make a sortie and attack the Williamites in the breach from the outside. After three and a half hours of fighting, William finally calls off the assault.

William’s men suffer about 3,000 casualties, including many of their best Dutch, Danish, German, and Huguenot troops. The Jacobites lose only 400 men in the battle. Due to the worsening weather, William calls off the siege and puts his troops into winter quarters, where another 2,000 of them die of disease. William himself leaves Ireland shortly afterwards, returning to London. He subsequently leaves London to take command of Allied forces fighting in Flanders and leaves Godert de Ginkell to command in Ireland. The following year Ginkell wins a significant victory at the Battle of Aughrim.

Limerick is to remain a Jacobite stronghold until it surrenders after another Williamite siege the following year. Following the loss of this last major stronghold, Patrick Sarsfield leads the army into exile in the Flight of the Wild Geese to the Continent, where they continue to serve the cause of James II and his successors.