Humbert crosses the River Shannon at Ballintra Bridge on September 7, destroying it behind them, and continues to Drumshanbo where they spend the night – halfway between his landing-point and Dublin. News reaches him of the defeat of the Westmeath and Longford rebels at Wilson’s Hospital School at Multyfarmham and Granard from the trickle of rebels who have survived the slaughter and reached his camp. With Cornwallis’ huge force blocking the road to Dublin, facing constant harassment of his rearguard and the pending arrival of General Gerard Lake‘s command, Humbert decides to make a stand the next day at the townland of Ballinamuck on the Longford/Leitrim county border.
Humbert faces over 12,000 Irishmen and English forces. General Lake is close behind with 14,000 men, and Cornwallis is on his right at Carrick-on-Shannon with 15,000. The battle begins with a short artillery duel followed by a dragoon charge on exposed Irish rebels. There is a brief struggle when French lines are breached which only ceases when Humbert signals his intention to surrender and his officers order their men to lay down their muskets. The battle lasts little more than an hour.
While the French surrender is being taken, the 1,000 or so Irish allies of the French under Colonel Bartholomew Teeling, an Irish officer in the French army, hold onto their arms without signaling the intention to surrender or being offered terms. An attack by infantry followed by a dragoon charge breaks and scatters the Irish who are pursued into a bog where they are either bayoneted or drowned.
A total of 96 French officers and 746 men are taken prisoner. British losses are initially reported as 3 killed and 16 wounded or missing, but the number of killed alone is later reported as twelve. Approximately 500 French and Irish lay dead on the field. Two hundred Irish prisoners are taken in the mopping-up operations, almost all of whom are later hanged, including Matthew Tone, brother of Wolfe Tone. The prisoners are moved to the Carrick-on-Shannon Gaol. The French are given prisoner or war status however the Irish are not and some are hanged and buried in St. Johnstown, today known as Ballinalee, where most are executed in a field that is known locally as Bully’s Acre.
Humbert and his men are transported by canal to Dublin and exchanged for British prisoners of war. Government forces subsequently slowly spread out into the rebel-held “Irish Republic,” engaging in numerous skirmishes with rebel holdouts. These sweeps reach their climax on September 23 when Killala is captured by government forces. During these sweeps, suspected rebels are frequently summarily executed while many houses thought to be housing rebels are burned. French prisoners of war are swiftly repatriated, while United Irishmen rebels are executed. Numerous rebels take to the countryside and continue guerrilla operations, which take government forces some months to suppress. The defeat at Ballinamuck leaves a strong imprint on Irish social memory and features strongly in local folklore. Numerous oral traditions are later collected about the battle, principally in the 1930’s by historian Richard Hayes and the Irish Folklore Commission.
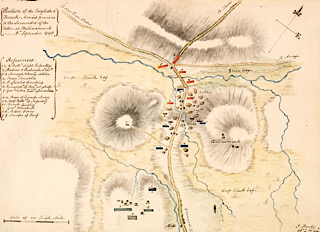
(Pictured: Watercolour plan by an I. Hardy of the Battle of Ballinamuck in County Longford on September 8, 1798, showing position of the English & French Armies previous to the surrender of the latter at Balinamuck)
On July 3, Father John Patrick Dunn of the Church of St. Philip Neri in the Southwark District is warned that the church might be attacked during an upcoming parade held by the Native American Party. The Native American Party, a nativist political party, plans to hold a large parade the next day on Independence Day.
Five of the muskets placed in St. Philip Neri’s Church are discovered to be defective and are sent back to the Frankford Arsenal to be repaired. No violence occurs before or during the parade, but on July 5, a nativist mob numbering in the thousands gathers at the church after some observe five defective muskets being returned to the church. They then demand that the sheriff remove the weapons, while Father Dunn and volunteers rally to protect the church. Sheriff Morton McMichael and two aldermen search the church and remove twelve muskets. After leaving the church, the sheriff urges the crowd to disperse and leaves a volunteer posse to guard the church. The mob remains, and a man injured in the May riots makes a speech to the crowd, calling for a second search of the church. The sheriff, an alderman, and seventeen nativists enter the church and find three armed men, fifty-three muskets, ten pistols, a keg of gunpowder and ammunition. To avoid inciting the mob, the sheriff decides not to remove the armaments, and the search party stays in the church. Just after midnight, July 6, Major General Patterson orders a company of city guards to clear the streets. After the crowd disperses, the arms found within the church are removed.
By midday, the crowds return around St. Philip Neri’s Church. GeneralGeorge Cadwalader orders the crowds to disperse, but they do not. By the evening, the sheriff arrives with a 150-strong posse. Throughout the evening, the military presence grows, and three cannons are stationed on the streets. The soldiers clear the streets near the church, despite being pelted with rocks by the mob. Responding to the rock throwers, General Cadwalader orders a cannon to be fired at the crowd on Third Street. Former U.S. CongressmanCharles Naylor begs the general not to fire. He and several others are arrested and held within the church. By the morning of July 7, most of the soldiers have left, but the crowds, led by an alderman and the sheriff, return and demand that the remaining guard release Naylor. Everyone except Naylor is released. The crowds grow, and a cannon is brought from a nearby wharf and used to threaten the church. After further negotiations, Naylor is released and carried home to cheers on people’s shoulders.
After Naylor is brought home, the mob attacks the church, damaging a wall with the cannon. A second cannon is brought from the wharfs and fired at the church, after which the mob pelts the building with rocks and break in through a side door. The soldiers fire on the men breaking into the church, who promptly retreat. After retreating, the nativists negotiate with the guard, who agrees to withdraw, allowing the nativists to guard the church. The crowd pelts the soldiers with rocks and some soldiers fire back, which only incites the mob further. The mob forces its way into the church, causing extensive damage to the interior. After about an hour, a group of twenty men organizes themselves to guard St. Philip Neri’s, and the mob leaves the church.
By the evening, a large number of soldiers arrive with orders to clear the streets, only to be stoned in the process. After a captain is attacked, the order is given to fire on the mob, which results in seven fatalities and nine injuries. Not long after, people with muskets and cannons arrive and fierce fighting breaks out between the soldiers and the mob. The fighting lasts for several hours, with the soldiers being fired upon from alleyways and the windows of nearby buildings. The soldiers bring in two cannons of their own and fire on the mob. The mob returns fire using their own cannons, armed with items such as nails, chains, knives and broken bottles. In an attempt to capture the mob’s cannons, soldiers charge one cannon’s position, only to be knocked off their horses by a rope tied across the street. The cannons are all eventually captured, and by early morning on July 8, the fighting has ended.
At least fifteen people, including rioters and soldiers, are killed in the riot, and at least fifty people are injured. Under Governor Porter’s orders, state troops continue to arrive in the city in the days afterward, but no further violence takes place. An estimated 5,000 militia are used to stop violence. Troops begin to withdraw from the city on July 10, and the church takes over responsibility from the district of Southwark of protecting the church on July 11. As with the May riots, a grand jury blames the Irish Catholics for the riots but supports the military’s response to the violence.
The riots gain national attention and condemnation. The riots are used as an issue in the 1844 U.S. Presidential election, the Democratic Party condemning the growing Native American Party and the Whig Party, which the Democrats accuse of involvement in the nativist movement. In Philadelphia, the Native American Party ends up making a strong showing in the city’s October election.
On July 11, 1844, Philadelphia passes an ordinance that gives the city a battalion of artillery, a regiment of infantry, and at least one full troop of cavalry to preserve peace within the city when necessary. The difficulty of quelling the riots and other crime leads the Pennsylvania General Assembly to pass an 1845 act that requires Philadelphia, the township of Moyamensing and the unincorporated districts of Spring Garden, Northern Liberties, and Penn to maintain a police force of one man per 150 taxable inhabitants. In 1850, another act is passed that establishes that the Philadelphia police force will police the city and seven surrounding districts. The inability to maintain order effectively in Philadelphia’s suburbs is an important argument for the consolidation of the city in 1854.
After the riots, Bishop Kenrick ends his efforts to influence the public education system and begins encouraging the creation of Catholic schools, with 17 being founded by 1860. The friars of the Church of St. Augustine sue the city of Philadelphia for not providing the church with adequate protection, claiming $80,000 in damages. The city argues that the friars cannot claim their civil rights were violated, as the Order of Saint Augustine is a foreign organization under the Pope. Furthermore, the city argues that the friars took a vow of poverty and cannot be property owners. The Augustinians end up proving the Order is incorporated in 1804 and is awarded $45,000. The church is rebuilt in 1848.
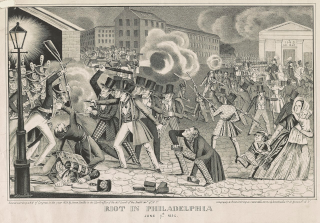
(Pictured: “Riot in Philadelphia,” lithograph by H. Bucholzer, 1844, Library of Congress)
The Battle of Aughrim (Irish: Cath Eachroma), the decisive battle of the Williamite War in Ireland, is fought on July 22, 1691, near the village of Aughrim, County Galway. It is fought between the largely Irish Jacobite army loyal to James II and the forces of William III. The battle is possibly the bloodiest ever fought in the British Isles with 5,000–7,000 people being killed. The Jacobite defeat at Aughrim means the effective end of James’s cause in Ireland, although the city of Limerick holds out until the autumn of 1691.
After heavy mist all morning, Dutch officer Godert de Ginkel, who is leading William’s forces, moves his forces into position by about two o’clock in the afternoon, and both sides cannonade each other for the next few hours. Ginkel planns to avoid fully joining battle until the next day. He orders a probing attack on the Jacobites’ weaker right flank led by a captain and sixteen Danish troopers, followed by 200 of Sir Albert Cunningham‘s 6th (Inniskilling) Dragoons. The Jacobite response demonstrates the strength of their defence, but also means that the attackers are no longer able to break off the engagement as Ginkel had planned. A conference is held at about 4:00 p.m. Ginkel still favours withdrawing, but the Williamite infantry general Hugh Mackay argues for an immediate full-scale attack.
The battle is joined in earnest between five and six o’clock. In the centre, the largely English and Scots regiments under Mackay attempt a frontal assault on Major-GeneralWilliam Dorrington‘s infantry on Kilcommadan Hill. The attackers have to contend with waist-deep water and a tenacious Irish defence of the reinforced hedgelines. They withdraw with heavy losses as the Jacobites pursue them downhill, capturing colonels Thomas Erle and Henry Herbert.
On their left centre, the Williamites advance across low ground exposed to Jacobite fire and take a great number of casualties. The Williamite assault in this area, led by St. John’s and Tiffin’s regiments and the Huguenot foot, is driven back into the bog by the Irish foot fighting with clubbed (reversed) muskets. Many of the attackers are killed or drowned. In the rout, the pursuing Jacobites manage to spike a battery of Williamite guns. The Jacobite regiments of the Royal Irish Regiment of Foot Guards and Gordon O’Neill are said to have fought particularly strongly. The musketry is so intense that “the ridges seemed to be ablaze” according to Andreas Claudianus, a Norwegian fighting with the Danish infantry.
The Jacobite right and centre holding firm, Ginkel tries to force a way across the causeway on the Jacobite left, where any attack would have to pass along a narrow lane covered by Walter Burke’s regiment from their positions in Aughrim castle. Four battalions led by Lieutenant GeneralPercy Kirke secure positions near the castle, following which Sir Francis Compton‘s Royal Horse Guards get across the causeway at the third attempt. Dorrington, having earlier withdrawn two battalions of infantry from this area to reinforce the Jacobite centre, are faced only with weak opposition, reaching Aughrim village. While a force of Jacobite cavalry and dragoons under Henry Luttrell have been tasked with covering this flank, their commander orders them to fall back, following a route now known locally as “Luttrell’s Pass.” He is later alleged to have been in the pay of William, though it seems most probable that Luttrell withdrew as he had little or no infantry support. The cavalry regiments of Henri de Massue, Lanier, Langston and Robert Byerley also cross the causeway, attacking Dorrington’s flank.
Most commentators, even those sympathetic to William, judge that the Irish foot fought exceptionally well. Appearing to believe that the battle could be won, General Charles Chalmot de Saint-Ruhe is heard to shout, “they are running, we will chase them back to the gates of Dublin,” before riding across the battlefield to direct the defence against the Williamite cavalry on his left wing. However, as he rides over to rally his cavalry, he pauses briefly to direct the fire of a battery and is decapitated by a cannonball. His death is said to have occurred around sunset, shortly after eight o’clock.
After Saint-Ruhe’s death the Jacobite leave, devoid of a senior commander, collapse very quickly. The regiment of Horse Guards leave the field almost immediately, followed shortly by the cavalry and dragoon regiments of Luttrell, Dominic Sheldon and Piers Butler. Chevalier de Tessé attempts to head a cavalry counterattack but is seriously wounded shortly afterwards. The Jacobite left flank is now exposed. Mackay and Thomas Tollemache also attack again in the centre, pushing the Jacobites towards the hilltop. Burke and his regiment, still holding the castle, are forced to surrender. Most of the infantry remain unaware of Saint-Ruhe’s death, however, and John Hamilton‘s infantry on the Jacobite right continues to counter-attack, fighting the Huguenot foot to a standstill in an area still known locally as the “Bloody Hollow.” At around nine o’clock towards nightfall the Jacobite infantry is finally pushed to the top of Killcommadan hill and broke, fleeing towards a bog in the left rear of their position, while their cavalry retreat towards Loughrea.
Patrick Sarsfield and Butler briefly try to organise a rearguard action but as in many battles of the period most of the Jacobite casualties occur in the pursuit, which is ended only by darkness and the onset of mist and rain. The defeated infantry is cut down by the Williamite cavalry as they try to get away, many of them having thrown away their weapons in order to run faster.
In addition to the rank and file the Jacobite casualties and prisoners include many of its most experienced infantry officers. The dead include brigadiers Barker, O’Neill and O’Connell, and colonels Moore, Talbot, O’Mahony, Nugent, Felix O’Neil and Ulick Burke, Lord Galway. The two major generals commanding the Jacobite centre, Hamilton and Dorrington, are both taken prisoner, Hamilton dying of wounds shortly afterwards. Though the killing of prisoners to prevent rescue is a common practice at the time, Jacobite soldiers are accused of having “cut to pieces” colonel Herbert after his capture. One contemporary Jacobite source, Charles Leslie, alleges that about 2,000 Jacobites are killed “in cold blood” with many, including Lord Galway and colonel Charles Moore, killed after being promised quarter.
An eyewitness with the Williamite army, George Story, writes that “from the top of the Hill where [the Jacobite] Camp had been,” the bodies “looked like a great Flock of Sheep, scattered up and down the Countrey for almost four Miles round.”
Estimates of the two armies’ losses vary, but they are extremely heavy overall. It is generally agreed that 5,000–7,000 men were killed at Aughrim. Aughrim has been described as “quite possibly the bloodiest battle ever fought in the British Isles,” but earlier medieval battles, although poorly recorded, may rival this battle in casualty numbers. At the time, the Williamites claimed to have lost only 600 and to have killed fully 7,000 Jacobites. Some recent studies put the Williamite losses as high as 3,000, but they are more generally given as between 1,000–2,000, with 4,000 Jacobites killed. Another 4,000 Jacobites deserted, while Ginkel recorded 526 prisoners taken of all ranks. While Ginkel had given word to Dorrington that the captives would be treated as prisoners of war, general officers were instead taken to the Tower of London as prisoners of state, while the majority of the rank and file were incarcerated on Lambay Island where many died of disease and starvation.
Aughrim is the decisive battle of the conflict. The Jacobites lost many experienced officers, along with much of the army’s equipment and supplies. The remnants of the Jacobite army retreat to the mountains before regrouping under Sarsfield’s command at Limerick. Many of their infantry regiments are seriously depleted. The city of Galway surrenders without a fight after the battle, on advantageous terms, while Sarsfield and the Jacobites’ main army surrender shortly afterwards at Limerick after a short siege.
The Scots Covenanters land an army in Ulster in 1642 to protect the Scottish settlers there from the massacres that follow the Irish Rebellion of 1641. They land at Carrickfergus and link up with Sir Robert Stewart and the Laggan Army of Protestant settlers from County Donegal in northwest Ulster. The Covenanters clear northeastern Ulster of Irish rebels by 1643 but are unable to advance south of mid-Ulster, which is held by Owen Roe O’Neill, the general of the Irish Confederate Ulster army.
In 1646, Monro leads a force composed of Scottish Covenanter regiments and Ulster settlers’ armies into Confederate-held territory. According to some accounts, this is the first step in a drive to take the Confederates’ capital at Kilkenny. Other sources say it is only a major raid. The combined force is about 6,000 strong. Monro has ten regiments of infantry, of whom six are Scottish and four are English or Anglo-Irish, and 600 Ulster Protestant cavalry. Stewart and the Laggan Army are slated to join Monro’s force in the attack, however, on the day of the battle the Laggan Army is in Clogher, nearly 30 kilometres away. O’Neill, who is a very cautious general, had previously avoided fighting pitched battles. However, he has just been supplied by the Papal Nuncio to Ireland, Giovanni Battista Rinuccini, with muskets, ammunition and money with which to pay his soldiers’ wages. This allows him to put over 5,000 men into the field, an army slightly smaller than his enemy’s. The Covenanters have six cannons, whereas the Confederates have none.
Monro assumes that O’Neill will try to avoid his army and has his soldiers march 24 kilometres to intercept the Irish force at Benburb, in modern south County Tyrone. Gerard Hayes-McCoy writes, “many of them must have been close to exhaustion before the battle began.” Monro’s men draw up with their backs to the River Blackwater, facing O’Neill’s troops who are positioned on a rise.
The battle begins with Monro’s artillery firing on the Irish position, but without causing many casualties. Monro’s cavalry then charges the Irish infantry but are unable to break the Confederates’ pike and musket formation. When this attack fails, O’Neill orders his infantry to advance, pushing the Monro’s forces back into a loop of the river by the push of pike. It is noted that the Irish pikes have longer shafts and narrower heads than those of their opponents, meaning that they outreach them and are “better to pierce.” At this point, the fatigue of Monro’s troops is apparent as they are gradually pushed back until their formation collapses in on itself. The Confederate infantry then breaks Monro’s disordered formation with a musket volley at point-blank range and falls in amongst them with swords and scians (Irish long knives). Monro and his cavalry flee the scene, as, shortly after, does his infantry. A great many of them are cut down or drowned in the ensuing pursuit. Monro’s losses are estimated to be between 2,000 and 3,000 men, killed or wounded. The Irish casualties are estimated to be 300.
O’Neill’s victory means that the Covenanters are no longer a threat to the Confederates, but they remain encamped around Carrickfergus for the rest of the war. O’Neill does not follow up his victory but takes his army south to intervene in the politics of the Irish Confederation. In particular, he wants to make sure that the treaty the Supreme Council of the Confederates has signed with the English Royalists will not be ratified.
Montgomery is born into a wealthy family in Swords, Dublin, on December 2, 1738. He attends Trinity College Dublin before dropping out to become a Junior Non-Commissioned Officer (NCO) in the British Army. He serves with distinction during the Seven Years’ War, more commonly known as the French and Indian War, and is promoted several times, finally attaining the rank of captain before the end of the war. He is released from duty due to his health and returns to Great Britain to recover. In Britain, he discusses politics and affiliates with the Whigs political party in Parliament, who later supports American independence. When his health finally recovers, he resigns his commission from the British Army and moves to New York, settling into the life of a farmer. On July 24, 1773, he marries Janet Livingston, who is from an anti-British patriot family. He continues to cement his beliefs and begins to identify as an “American” rather than a “Briton.”
Eventually, Montgomery’s political beliefs turn into political action. In May 1775, he is elected as one of the ten deputies to represent Dutchess County in the New York Provincial Congress and is chosen to organize the militias and defenses of New York. After George Washington is chosen to be the commander of the Continental Army in June of the same year, the New York Provincial Congress is asked to choose two people for the rank major general and brigadier general for service in the new army. Philip Schuyler is appointed to the rank of major general. Montgomery protests the promotion, arguing that Schuyler does not have enough combat experience to be an effective leader. Later, the New York Provincial Congress appoints Montgomery as brigadier general because of his military experience. General Washington personally appoints the reluctant Montgomery to be Schuyler’s second in command. This move is just in time as Schuyler falls ill during at the start of the invasion of Canada, thus giving Montgomery control of the campaign.
Once in command, Montgomery begins a successful campaign in Canada as General Benedict Arnold is marching through the wilderness of modern-day Maine to meet him in Quebec. He captures numerous strongpoints and eventually the city of Montreal falls to the Patriots. His numerous victories and kind treatment of British prisoners take a toll on the Patriot militias under his command, who demand rest and the same provisions given to the British prisoners. The commanding general is reluctant to lead his soldiers, who he has seen as undisciplined. It takes a personal letter from General Washington to reassure him that there is insubordination and lack of discipline all throughout the Continental Army and that resignation is not the answer. Nevertheless, he continues to Quebec to meet Arnold and his army.
When Montgomery and his men arrive outside Quebec, his force consists of some 300 men compared to Arnold’s 1,000 men. Now a major general, he establishes siege lines around the city of Quebec and demands the surrender of the defenders within. The terms of surrender are rejected numerous times, leaving him and Arnold with no other choice but to assault the city. He hopes that snow will hide the movement of his troops, thus, he plans on waiting for snowfall in order to attack. General Arnold, however, is worried about his men. A December 31 enlistment expiration is looming, that could drastically reduce the size of the assaulting force. Montgomery discovers waiting for the right time is not an option and coordinates an attack for the early hours of December 31, 1775. That morning, Montgomery leads a group of his men toward the interior of Quebec. With sword drawn and lantern out, the Patriots advance toward a blockhouse where the British and Canadian defenders notice this movement and let loose a volley of grapeshot and muskets, which instantly kills Montgomery and the men close to him.
Montgomery’s body is discovered after the failed attacks by the Continentals. The British defenders of Quebec bring his body to General Guy Carleton, who orders it be buried with respect and dignity. He is laid to rest in Quebec on January 4, 1776. News of his death causes widespread mourning, both in America and in the British Isles. Many Patriots elevate his status to a hero and martyr for independence and the American cause, while British members of parliament, especially the Whigs, use his death to mark the failures in the British response to the insurrection in their colonies. In July 1818 his remains are reinterred in New York.
A British advance force of 400 is defeated at Tuberneering on June 4. This rebel victory punches a hole in the dragnet the military has attempted to throw around County Wexford and also yields them three artillery pieces. The town of Arklow has been evacuated in the ensuing panic but the rebels content themselves with taking the town of Gorey and staying within the Wexford border. On June 5 the rebels attempt to break out of County Wexford across the River Barrow and to spread the rebellion but are halted by a major British victory at the Battle of New Ross. When the rebels finally move against Arklow, the town has been reoccupied by a force of 1,700 men sent from Dublin under Francis Needham, 1st Earl of Kilmorey, who quickly fortifies the town with barricades and has artillery positioned on all the approaches to the town.
The rebel army that forms for attack on the afternoon of June 9 is a combined force of Wexford and Wicklow rebels led by Billy Byrne, Anthony Perry, Conor McEvoy, Edward Fitzgerald, and Fr. Michael Murphy. The British in Arklow consist of approximately 1,000 militia from counties Antrim and Cavan and 150 regular cavalry supported by 250 Yeomanry. They are joined by 315 Durham Fencibles (Princess of Wales’s Fencible Dragoons) arriving an hour before the rebels.
The area surrounding the town and the approaches is covered by scrub and the rebel strategy adopted is to advance under cover attacking the town simultaneously from several points. Before the action begins, the rebels under Esmonde Kyan open fire upon the town with some of the artillery captured at Tuberneering and have some success by scoring a direct hit on a British artillery position, destroying the cannon and killing the attendant crew. The main assault is quickly launched but at all entry points the Irish are thrown back by the musket fire of the well-trained and disciplined militia and volunteers, and canister shot from the 3 pounder battalion gun brought by the fencibles. An attempt by the British to turn the Irish failure into a rout is defeated when pikemen and sharpshooters drive a cavalry charge back across the River Avoca, but an attempt to force a way into the town through the outlying fishing port is bloodily repulsed.
As Irish casualties mount, the lack of ammunition and proper leadership begin to work against them, and after Fr. Murphy is killed leading a charge, their attacks start to fade. As nightfall comes, the rebels begin to withdraw under cover of darkness and collect their wounded. They are not pursued or molested by the garrison who are, unknown to the rebels, down to their last three or four rounds per man and are themselves at the brink of defeat.
While rebel casualties are estimated at about 1,000 no full casualty list seems to exist on the British side, but are probably in the region of 100 dead and wounded. The defeat at Arklow marks the third failure to extend the fight for Irish independence beyond the borders of County Wexford following the other bloody repulses at New Ross and Bunclody. The Irish strategy now changes to a policy of static defence against the encroaching British armies.
The Nine Years War begins with a conflict over English efforts to maintain a string of garrisons along the southern border of Tyrone’s territory in Ulster. The Irish leader promptly besieges the English garrison at Monaghan Castle, and Sir Henry Bagenal, commander of the English forces, marches out to its relief on May 25 from Dundalk, via Newry. His army is made up of 1,750 troops, including some veterans and certain companies newly arrived from the Spanish campaign in Brittany, but there are many recruits in the ranks. Bagenal’s men are predominantly infantry, armed with muskets and pikes. There is also a small number of horsemen raised in the Pale.
The Battle of Clontibret is essentially a two day running battle, as Bagenal’s column is ambushed on its way to and from the castle at Monaghan town. The Irish fight sharply along the roads about Crossdall, around 4 miles from Monaghan, firing on the English column with calivers from the surrounding woodland. With the loss of 12 dead and 30 wounded the English reach the castle, which is re-supplied and reinforced with one company. Bagenal has misgivings about his supply of powder and lead, much of which had been used on the way, and can afford little for the garrison before he starts back.
Two days later, on May 27, Bagenal sets out for Newry in a column, but by another route, past the townland of Clontibret. The route lay through drumlin country, which abounds with hills, bogs and woods, making it ideal for an ambush. The column comes under fire from the outset, and then falls into a major ambush at a pass near Clontibret. Tyrone’s army, about 4,000 strong, consists of contingents from the O’Neill, MacMahon and Maguire clans, as well as Scottish mercenaries. The Irish also deploy a greatly enlarged force of cavalry and caliver-men. To Bagenal’s puzzlement, the caliver-men are turned out in red coats and acquitted themselves with expertise. Fire from the flanks is heavy, and many English troops are killed or wounded while the Irish cavalry plays around the fringes. Tyrone himself is almost killed in hand-to-hand combat with a Palesman named Seagrave, who leads a cavalry charge on the Irish position. Seagrave has his arm chopped off by Tyrone’s standard bearer O’Cahan, and is killed by Tyrone with a dagger thrust to the groin. Bagenal’s column is slowed to a crawl and, as night falls in the wilderness, the commander calls his men to a halt and camps at the hilltop of Ballymacowen. It seems that hundreds are missing, and there is fear that the Irish will renew the attack under cover of darkness. There is no further attack and, a little after first light, reinforcements from Newry arrive to relieve the column.
According to intelligence received in the days following, Tyrone’s failure to follow up is caused by a lack of powder, ironic given the state of Bagenal’s own supplies. The overall sense in government is of disquiet, and a bad job is made of hushing up the casualty figures. This gives fuel to the rumours of a severe defeat, and many people set greater store on the numbers put about by confederate supporters.
Sir Ralph Lane, the muster-master-general, informs the queen’s principal secretary, William Cecil, 1st Baron Burghley, that “more men were hurt and killed in that late service than was convenient to declare.” The casualty figures for both sides vary depending on sources. Bagenal admits only 31 killed and 109 wounded on the second day of fighting, but his losses are almost certainly higher. The Irish annals claimed up to 700 English killed. Estimates of the confederate losses vary between 100 to 400 killed. Three years later, Bagenal leads an army into another ambush by Tyrone, at the Battle of the Yellow Ford. The English general is killed and his troops are routed with heavy losses.
(From: “Battle of Clontibret,” wikia.org, https://military.wikia.org | Pictured: The marker stone on the northern edge of the battlefield commemorating the Irish victory at Clontibret, 1595)
Ahern and Paisley discuss political and economic developments in Northern Ireland and increasing cross-Border co-operation. The Taoiseach says he is honoured to visit the north Antrim heartland of the Democratic Unionist Party (DUP) leader.
“I do not believe even a year back it could have been envisaged we would have been together here,” Ahern says. “It is an honour to be here with the First Minister to talk about progress.”
Paisley jokes that Ahern and his entourage had held a prayer meeting in their helicopter hoping that they would not be pelted with snowballs by him, a reference to his famous protest when former Taoiseach Seán Lemass visited Stormont in 1965.
When asked about welcoming the Fianna Fáil leader to his constituency Paisley quips, “What I am saying is he is in under my control. This is a good day for work. It is a good day for our province. It is a good day for the whole of Ireland because we need help from outside. We cannot live on our own.”
Ahern and Paisley meet again the following week at the Dublin Chamber of Commerce AGM dinner where Paisley has been invited to be a guest speaker.
The engagement is the latest visit to the Republic by the DUP leader since the Assembly was restored in Stormont the previous May. The Taoiseach invites Paisley to the historic Battle of the Boyne battle site in County Louth in July where the DUP leader presents a 17th-century musket to Ahern.