Humbert crosses the River Shannon at Ballintra Bridge on September 7, destroying it behind them, and continues to Drumshanbo where they spend the night – halfway between his landing-point and Dublin. News reaches him of the defeat of the Westmeath and Longford rebels at Wilson’s Hospital School at Multyfarmham and Granard from the trickle of rebels who have survived the slaughter and reached his camp. With Cornwallis’ huge force blocking the road to Dublin, facing constant harassment of his rearguard and the pending arrival of General Gerard Lake‘s command, Humbert decides to make a stand the next day at the townland of Ballinamuck on the Longford/Leitrim county border.
Humbert faces over 12,000 Irishmen and English forces. General Lake is close behind with 14,000 men, and Cornwallis is on his right at Carrick-on-Shannon with 15,000. The battle begins with a short artillery duel followed by a dragoon charge on exposed Irish rebels. There is a brief struggle when French lines are breached which only ceases when Humbert signals his intention to surrender and his officers order their men to lay down their muskets. The battle lasts little more than an hour.
While the French surrender is being taken, the 1,000 or so Irish allies of the French under Colonel Bartholomew Teeling, an Irish officer in the French army, hold onto their arms without signaling the intention to surrender or being offered terms. An attack by infantry followed by a dragoon charge breaks and scatters the Irish who are pursued into a bog where they are either bayoneted or drowned.
A total of 96 French officers and 746 men are taken prisoner. British losses are initially reported as 3 killed and 16 wounded or missing, but the number of killed alone is later reported as twelve. Approximately 500 French and Irish lay dead on the field. Two hundred Irish prisoners are taken in the mopping-up operations, almost all of whom are later hanged, including Matthew Tone, brother of Wolfe Tone. The prisoners are moved to the Carrick-on-Shannon Gaol. The French are given prisoner or war status however the Irish are not and some are hanged and buried in St. Johnstown, today known as Ballinalee, where most are executed in a field that is known locally as Bully’s Acre.
Humbert and his men are transported by canal to Dublin and exchanged for British prisoners of war. Government forces subsequently slowly spread out into the rebel-held “Irish Republic,” engaging in numerous skirmishes with rebel holdouts. These sweeps reach their climax on September 23 when Killala is captured by government forces. During these sweeps, suspected rebels are frequently summarily executed while many houses thought to be housing rebels are burned. French prisoners of war are swiftly repatriated, while United Irishmen rebels are executed. Numerous rebels take to the countryside and continue guerrilla operations, which take government forces some months to suppress. The defeat at Ballinamuck leaves a strong imprint on Irish social memory and features strongly in local folklore. Numerous oral traditions are later collected about the battle, principally in the 1930’s by historian Richard Hayes and the Irish Folklore Commission.
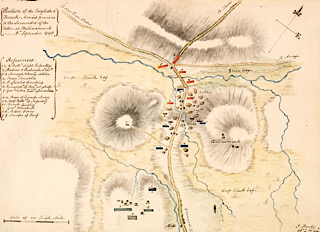
(Pictured: Watercolour plan by an I. Hardy of the Battle of Ballinamuck in County Longford on September 8, 1798, showing position of the English & French Armies previous to the surrender of the latter at Balinamuck)
Eugene welcomes the prospect of a decisive battle, and waits on the eastern side of the Oglio to be attacked. The Imperial commander has chosen his ground carefully, entrenching his troops and guns in front of the small fortress of Chiari. Streams protect his position on three sides so, as there is not enough room for a cavalry engagement, Eugene can count on a frontal attack by the French infantry. Two battalions and a few pieces of artillery are placed in Chiari itself.
Villeroy ignores Catinat’s warning that Eugene is in a strong position, remarking that the King, “had not sent so many brave men just to look at the enemy through their spy glasses.” On September 1, the Franco-Spanish infantry advances. Deceived by the report of spies that the Imperialists are retiring, Villeroy crosse the Oglio and pushes on to Chiari expecting to attack their rearguard. The attack begins around 2:00 p.m. when three French brigades approach Chiari and overpower the Imperial troops there without much difficulty. However, instead of facing the rearguard, the French commander encounters the whole Imperial army securely entrenched in their positions. As the Bourbons’ army approaches the Imperial positions, Eugene forbids his men to fire. Loading their artillery with canister shot, they only unleash a withering fire when the Bourbon army enters point-blank range. This disorders the attackers and chaos ensues which the French and Spanish commanders cannot suppress. While this is going on, Chiari is recaptured by the Imperials after a fierce struggle. The Bourbons are driven back with heavy casualties in a contest as destructive as any battle during the war in Italy. With only minor losses, the Imperial army inflicts over 3,000 casualties in the ranks, and over 250 officers. This number grows rapidly as fever attacks the wounded.
Villeroy loses personal control during the battle, and Catinat, despite being wounded, has to organise a retreat. The French dig themselves in only a mile or so away from the Austrians on the same side of the Oglio. Here, the two opposing sides remain for the next two months: the French are too much discouraged by their repulse to resume the assault, and Eugene is unwilling to risk the advantages he had gained by attacking the French in their strong defensive position. However, as autumn advances, conditions deteriorate in both camps: fodder is so short that Eugene’s horses are forced to eat fallen leaves. But the French, whose camp is built on marshy ground, suffers most, and they move out first in mid-November, crossing the Oglio before entering winter quarters in the Duchy of Milan.
In Milan, the French presence proves increasingly unpopular: five million French livres for soldiers’ pay and lodgings, and two million for fodder, has soon been imposed on the local population, most of which has to be taken by force. For his winter quarters, Eugene proceeds to reduce the whole Duchy of Mantua, except the capital and Goito, which he closely blockades. Shortly after he occupies Mirandola and Guastalla. Eugene’s relationship with the local population has been good and he has kept a tight control: he has executed 48 of his men for looting, telling the Emperor that he had “imposed more severe discipline than has possibly ever been seen in an army.” Eugene receives little cash from the Emperor, far less than he expects, but he secures a sound footing in northern Italy and, as hoped, his success helps to encourage the Maritime Powers to come to the aid of Leopold I. Since the beginning of the year Count Johann Wenzel Wratislaw von Mitrowitz has been in London as Imperial minister, pressing for assistance. With Eugene’s two victories (Carpi and Chiari), Leopold I has proven he would fight to protect his interests, giving Wratislaw the arguments he needs to push through the alliance with the Maritime Powers. On September 7, 1701, within a week of the battle, England and the Dutch Republic sign the second treaty of the Grand Alliance, backing the Emperor’s claims to the Spanish possessions in Italy.
The French are still in Milan, but their position is weak: morale is poor and desertion is high. Louis XIV writes to Villeroy urging him to work closely with Catinat and “not again to attack the enemy without advantage.” “If you do … the King, my grandson, will lose Italy.” By October, French optimism for the campaign is gone, but Louis XIV hopes to send reinforcements for the next year’s campaign, believing the Emperor will not be able to make a comparable increase in Eugene’s strength. However, the campaign season is not yet over. As Villeroy settles down for the winter, Eugene is preparing to attack him at his headquarters in Cremona.
In Enniskillen, armed Williamite civilians drawn from the local Protestant population organise a formidable irregular military force. The armed civilians of Enniskillen ignore an order from Robert Lundy that they should fall back to Derry and instead launch guerrilla attacks against the Jacobites. Operating with Enniskillen as a base, they carry out raids against the Jacobite forces in Connacht and Ulster, plundering Trillick, burning Augher Castle, and raiding Clones.
A Jacobite army of about 3,000 men, led by Justin McCarthy, Viscount Mountcashel (in the Jacobite peerage), advance on them from Dublin. Lord Mountcashel’s men consist of three regiments of infantry and two of dragoons. The regiments include his own regiment, Mountcashel (approx. 650 men in 13 companies), The O’Brien regiment (also 13 companies of 650 men), and the Lord Bophin (Burke) regiment. He also has the dragoon regiments of Cotter and Clare, each with seven companies of about 350 dragoons. On July 28, 1689, Mountcashel’s force encamps near Enniskillen and bombards the Williamite outpost of Crom Castle to the southeast of Enniskillen. Crom Castle is almost 20 miles (32 km) from Enniskillen by road and about 5 miles (8.0 km) from Newtownbutler.
Two days later, they are confronted by about 2,000 Williamite ‘Inniskilliniers’ under Colonel Berry, Colonel William Wolseley and Gustave Hamilton. The Jacobite dragoons under Antoine Hamilton stumble into an ambush laid by Berry’s men near Lisnaskea and are routed, taking 230 casualties. Mountcashel manages to drive off Berry’s cavalry with his main force but is then faced with the bulk of the Williamite strength under Wolseley. There is some debate in the sources over troop numbers, though it is believed that Mountcashel has a large number of poorly armed conscripts. Unwisely, Mountcashel halts and draws up his men for battle about a mile south of Newtownbutler.
Williamite histories claim that many of the Jacobite troops flee as the first shots are fired. Up to 1,500 of them are hacked down or drowned in Upper Lough Erne when pursued by the Williamite cavalry. Of the 500 men who try to swim across the Lough, only one survives. Approximately 400 Jacobite officers, along with Lord Mountcashel, the Jacobite commander, are captured and later exchanged for Williamite prisoners, with the other Jacobites being killed. These claims seem unlikely, for several reasons. Each Irish regiment includes approximately 40 officers. The entire force, therefore, would include only about 200 officers. Many of these officers are accounted for in an October 1689 roll call, which shows approximately a 15–20% change in the officer roll call since July for the infantry regiments and 5% for the dragoons. This totals some 20–30 officers in all. Also, the Mountcashel regiment’s roll call for October shows that companies which would normally have 50–60 men, have around 25, which results in a loss of approximately 300–400 men for this regiment. The Cotter and Clare dragoons who ride away from the battle do not have significant losses, based on the October 1689 roll call. Assuming the other two infantry regiments suffer similar losses, gives a total loss of 1,200–1,300. Given their officers are recorded in the October roll and show fewer losses than the Mountcashel regiment among officers, there may be fewer losses in the ranks as well. The Williamite histories acknowledge that they captured approximately 400, including men who are later sent to Derry, which would indicate a total loss of killed, wounded, and missing of 800–900, and likely less. This number is necessarily an estimate based on the available data but should be contrasted with Williamite claims that they killed and drowned 2,000. It appears likely that a couple of hundred men from Mountcashel’s regiment may have fled into the bogs toward Lough Erne, and some of them who made it to the river tried to swim and were drowned, leading to the story of the hundreds drowned.
The battle is still commemorated by the Orange Order in Ulster and is mentioned in the traditional unionist song, “The Sash.”
The battle is significant in another way: the regiments on both sides go on to have long and famous histories. On the Williamite side, the Innsikilling Regiment (27th Foot), and on the Jacobite side, the Clare and Mountcashel/Lee/Bulkeley regiments of the Irish Brigade. The two Irish regiments face off again at the Battle of Fontenoy in 1745, where the Irish Brigade famously drives the British army from the battlefield with a charge in the final stage of the battle.
News of the outbreak of the rebellion prompts Major-General Sir James Duff, Military Commander in Limerick, to gather a force of about 600 men, mainly Dublinmilitia members, backed up by seven artillery pieces, and sets out on a forced march to Dublin on May 27. His twin objectives are to restore communications between the two cities and to crush any resistance encountered on the way. As the soldiers enter County Kildare, they discover the bodies of several rebel victims, among them Lieutenant William Giffard, the son of the commander of the Dublin militia, Captain John Giffard, which reportedly inflames the soldiers.
However, by the time Duff’s column arrives in Monasterevin in County Kildare, at 7:00 a.m. on May 29, the bulk of the rebel forces have already accepted a government amnesty from Generals Gerard Lake and Ralph Dundas, following their defeat at the Battle of Kilcullen and had surrendered at Knockaulin Hill, several kilometres to the east of the Curragh on May 27. Not aware that the rebels are gathering to surrender on the Curragh plain, Duff reinforces his column and marches to the nearby town of Kildare, and on to the adjacent southwest corner of the Curragh.
Duff’s force had by now grown to 700 militia, dragoons and yeomanry with four pieces of artillery, three having been presumably left at Monasterevin. The designated place of surrender, the ancient fort of Gibbet Rath, is a wide expanse of plain with little or no cover for several kilometres around but neither the rebels nor Duff’s force have seemingly any reason to fear treachery as a separate peaceful surrender to General Dundas at Knockaulin Hill, who is accompanied only by two dragoons, has been successfully accomplished without bloodshed.
By the time of Duff’s arrival at Gibbet Rath on the morning of May 29, an army of between 1,000 and 2,000 rebels is waiting to surrender in return for the promised amnesty. They are subjected to an angry tirade for their treason by Duff who orders them to kneel for pardon and then to stack their arms. Shortly after the weapons are stacked, an infantry and cavalry assault results in the death of about 350 men. Accounts of why the massacre began differ. Rebel claims that Duff orders his troops to attack the disarmed and surrounded men are denied by Duff himself who claims that the rebels fired on his men, while another source records “one man in the crowd, saying he would not hand over his fire-lock loaded, blazed it off in the air”.
However, Duff redrafts his own official report of the engagement before submission to Dublin Castle, his final draft is transmitted without references to his knowledge of the surrender preparations. The original report reads as follows with the items in brackets excised from his final report:
“My Dear Genl. (I have witnessed a melancholy scene) We found the Rebels retiring from this Town on our arrival armed. We followed them with Dragoons; I sent on some of the Yeomen to tell them, on laying down their arms, they should not be hurt. Unfortunately some of them Fired on the Troops; from that moment they were attacked on all sides, nothing could stop the Rage of the Troops. I believe from Two to Three hundred of the Rebels were killed. (They intended, we are told, to lay down their arms to General Dundas). We have 3 men killed & several wounded. I am too fatigued to enlarge. I have forwarded the mails to Dublin.”
The grieving Captain John Giffard expresses his own satisfaction as follows:
“My troops did not leave my hero unavenged – 500 rebels bleaching on the Curragh of Kildare—that Curragh over which my sweet innocent girls walked with me last Summer, that Curragh was strewed with the vile carcasses of popish rebels and the accursed town of Kildare has been reduced to a heap of ashes by our hands.”
General Duff receives no censure for the massacre and, upon his arrival in Dublin the following day, is feted as a hero by the population who honour him with a victory parade. General Dundas, by contrast, is denounced for having shown clemency toward the rebels. However, because of the massacre, wavering rebels are discouraged from surrendering and there are no further capitulations in County Kildare until the final surrender of William Aylmer in July. Dr. Chambers considers that Lake and Duff are not in communication about the surrenders, being on opposite sides of the Curragh. Duff and his 500 men arrive in Kildare after a forced march from Limerick and find it sacked by the rebels, along with the piked body of Duff’s nephew.
Duff is later involved in an unsuccessful campaign after the Battle of Vinegar Hill to trap and destroy a surviving rebel column in Wexford led by Anthony Perry who fights and eludes Duff’s forces at the battle of Ballygullen/Whiteheaps on 5 July.
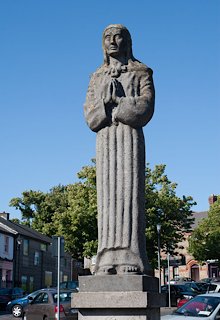
(Pictured: The statue of Saint Brigid at the Market Square of Kildare which is dedicated to the memory of the victims at Gibbet Rath)
The Battle of Glentaisie is fought in the north of Ulster on May 2, 1565. The result is a victory for Shane O’Neill over the Clan MacDonald of Dunnyveg. The conflict is a part of the political and military struggle for control of the north of Ireland, involving the English and occasionally the Scots. Although the MacDonalds are a Scottish family, based principally on the island of Islay in the Hebrides, they have long been associated with the Gaelic polity rather than the Kingdom of Scotland.
O’Neill assembles his army for the attack on the MacDonnells at the tower house of Feadan, at Fathom Mountain, near Newry. Traditionally, he “kept Easter” at Feadan, and an assembly of his clan would be unremarked until its size draws notice.
The MacDonnells expect O’Neill’s sizeable army to take some weeks to reach their territory on the Antrim coast. They start gathering as many warriors in the Highlands and Islands as they can muster. However, O’Neill advances with unprecedented speed. Within a week his army arrives at Edenduffcarrick.
Sorley Boy MacDonnell gathers a small holding force at a forward base at Cloughdonaghy. He attempts to stop O’Neill’s advancing army at Knockboy, a wooded pass in the hills above Broughshane. O’Neill sweeps Sorley’s ambush away, takes Cloughdonaghy and sends a force of cavalry to seize James MacDonald of Dunnyveg’s recently constructed Red Bay Castle. With the landing beaches at Waterfoot and Cushendall now controlled by O’Neill’s army, the first several hundred of MacDonnell’s men are compelled to land farther north. They land at Ballycastle beach to await the locally raised MacDonnnell army. Their plan is to await the arrival of their brother Alexander, the MacDonnell seneschal of Cantyre, who is assembling a second army composed from late comers to James of Dunnyveg’s army.
O’Neill does not permit the MacDonnells any time for their reinforcement to arrive. His advance guard continues to press the retreating MacDonnell army, who fall back from the beach through Ballycastle. They are driven past the area of the modern Diamond and well away from the river Tow, denying them the necessary water supply for a sizeable army.
Both armies set up camp for the night. O’Neill’s army occupies land at the centre of modern Ballycastle, between the modern Diamond and the river Tow, giving them full access to water. The combined MacDonnell army of around five hundred men occupy the exposed higher ground at Ramon, the ridge at the head of modern Castle Street, Ballycastle, where the Presbyterian Church now stands, with only a small well for their needs.
At very first light, O’Neill attacks uphill with a sudden onslaught led by his heavy Gallowglassinfantry. By forgoing the customary exchange of spears, darts, and arrows by the light infantry kernagh and Scots archers that customarily precede the usually decisive deployment of the Gallowglass corrughadh, or battalions, O’Neill surprises the MacDonnell army. The MacDonnell leaders try to rally their men, but after a violent interlude of some confusion, they break and flee over Knocklayd mountain in the direction of Glenshesk, heading back toward the beach at Cushendun. James of Dunnyveg is seriously wounded in the early fighting and his brother Angus MacDonnell is killed.
The attempt to flee by the old mountain road between Greenan and Ballypatrick Forest in an attempt to reach a possible landing place for their birlinns at Cushendun beach is finally stopped at a hollow at Legacapple. Sorley Boy and James are both taken prisoner. James dies of his wounds two months later at Castle Crocke, near Strabane. Their brother Alistair Og MacDonnell had landed at Rathlin, with the final levies raised in the Highlands and Islands, reputed to be nine hundred men. However, in the immediate aftermath of O’Neill’s decisive victory, Alistair can achieve nothing without a base on the mainland. O’Neill marches on along the north coast to mop up the MacDonnell garrisons and deny Alistair any foothold from which to launch a MacDonnell recovery. Dunseverick and Dunluce fall within a few days, and Alistair returns to Scotland.
The Protestant forces are taken by surprise and there is little fighting, reflected in the term “Break,” a Scottish word for rout. Victory secures eastern Ulster for the Jacobites but they fail to fully exploit their success.
While much of the Protestant population of east Ulster supports the claim of William III to thrones of Ireland, England and Scotland, the rest of Ireland, including the Lord Deputy of Ireland, Richard Talbot, 1st Earl of Tyrconnell, and the army, support James II. As a result, war breaks out in Ireland after James is deposed in the Glorious Revolution. At the start of the conflict, the Jacobites are left in control of two fortified positions at Carrickfergus and Charlemont in territory which is predominantly Williamite in sympathy. The local Williamites raise a militia and meet in a council at Hillsborough. They make an ineffective assault on Carrickfergus. However, this is easily beaten off and a local Catholic cleric named O’Hegarty reports that the Williamite are badly armed and trained.
The Jacobite commander in the north is Richard Hamilton, an experienced soldier who serves with the French military from 1671 to 1685, when he is appointed a colonel in the Irish Army. In September 1688, he and his regiment are transferred to England. When James flees into exile, he is held in the Tower of London. Released on parole by William in February, he is sent to negotiate with Talbot but drops this mission once back in Ireland. Alexander Osbourne, a Presbyterian clergyman, is sent to offer the Hillsborough council a pardon in return for surrender but they refuse, reportedly encouraged by Osbourne. On March 8, Hamilton marches north from Drogheda with 2,500 men to subdue the Williamites by force.
On March 14 Hamilton crosses the River Lagan and attacks a 3,000 strong Williamite force under Lord Mount Alexander at Dromore. Alexander’s cavalry falls back in disorder following a charge by the Jacobite dragoons. Seeing this, Hamilton orders a general advance of his infantry and the Williamite foot flee toward Dromore itself. They are overtaken in the village by the Jacobite cavalry and slaughtered, roughly 400 being killed and the rest fleeing for their lives.
Lord Mount Alexander rides to Donaghadee and takes a ship to England, while many other Protestants leave for Northern England or Scotland. Hamilton’s men capture Hillsborough, along with £1,000 and large stocks of food but fail to pursue their opponents. This allows the bulk of the militia under Rawdon and Henry Baker to reach Coleraine, then make their way to Derry, where they take part in the successful defence of the city.
During the first day of the battle, the Federal gunboats and the forts on shore engage in a gun battle, with occasional contributions from the Mosquito Fleet. Late in the day, Burnside’s soldiers go ashore unopposed. They are accompanied by six howitzers manned by sailors. As it is too late to fight, the invaders go into camp for the night.
On the second day, February 8, the Union soldiers advance but are stopped by an artillery battery and accompanying infantry in the center of the island. Although the Confederates believe that their line is safely anchored in impenetrable swamps, they are flanked on both sides and their soldiers are driven back to refuge in the forts. The forts are taken in reverse. With no way for his men to escape, Col. Shaw surrenders to avoid pointless bloodshed.
Aside from the men who are taken into captivity, casualties are rather light by American Civil War standards. The Federal forces lose 37 killed, 214 wounded, and 13 missing. The Confederates lose 23 killed, 58 wounded, and 62 missing.
Roanoke Island remains in Union control for the rest of the war. Immediately after the battle, the Federal gunboats pass the now-silent Confederate forts into Albemarle Sound and destroy what is left of the Mosquito Fleet at the Battle of Elizabeth City. Burnside uses the island as staging ground for later assaults on New Bern and Fort Macon, resulting in their capture. Several minor expeditions take other towns on the sounds. The Burnside Expedition ends in July, when its leader is called to Virginia to take part in the Richmond campaign.
After Burnside leaves, North Carolina ceases to be an active center of the war. With only one or two exceptions, no notable military actions take place until the last days of the conflict, when the Second Battle of Fort Fisher closes Wilmington, the last open port in the Confederacy.
At dawn on the morning of November 20, 1917, the 16th (Irish) Division of the British Army assaults an area of the German lines known as “Tunnel Trench,” named for an elaborate tunnel system that runs along it. The attack is meant as a diversion for the main attack, about eight miles to the southeast at Cambrai, France, where six infantry and two cavalry divisions of the British Expeditionary Force, with additional support from fourteen squadrons of the Royal Flying Corps, join the British Tank Corps in a surprise attack on the German lines.
By autumn 1917, three years into World War I, continuous shelling and lack of drainage has transformed the Ypres Salient, on the Western Front, into a waterlogged quagmire. In Ireland, meanwhile, a month earlier, Eamon de Valera becomes president of Sinn Féin and decides to push for an independent Irish republic. Despite the growing political turmoil at home, in France, on firm ground near the town of Cambrai, the British Army’s 16th (Irish) Division again proves to be formidable adversaries for the Germans.
According to the divisional historian, at Cambrai, the “swift and successful operation by 16th Division was a model of attack with a limited objective.” In addition to securing 3,000 yards of trench, 635 prisoners are captured from the German army’s 470th and 471st Regiments and 330 German bodies are counted in the trenches. More importantly, though, the mayhem caused by the diversionary assault contributes greatly to the initial success of the Cambrai offensive, though the offensive eventually sputters, dragging the war into 1918.
Cambrai becomes the field of operations when the British Commander-in-Chief, Field MarshalDouglas Haig, recognising that it is impossible to launch further military operations in the Ypres sector, seeks a new battlefield where he hopes success can be achieved before year’s end. Lieutenant ColonelJohn Fuller of the Tank Corps and GeneralJulian Byng, commander of the Third Army, recommend that a massed assault by 400 tanks should be mounted across the firm, chalky ground to the southwest of Cambrai. Haig adopts this proposal, confident that the tanks can punch a hole through the mighty Hindenburg Line and allow his underused Cavalry Divisions to break through to the enemy rear.
In order to create maximum confusion among the Germans, Sir Aylmer Haldane, commander of VI Corps, is ordered to stage a diversionary attack. The area selected for the assault is about eight miles to the northwest of Cambrai, where the British line passes through the villages of Bullecourt and Fontaine-lès-Croisilles. The units select to make this subsidiary attack are 3rd Army and 16th (Irish) Division.
The defences of the Hindenburg Line opposite VI Corps positions consists of Tunnel Trench, a heavily defended front-line trench, with a second, or support trench, some 300 yards behind. The whole area is scattered with concrete machine gun forts, or Mebus, similar to those that had decimated the 16th (Irish) Division at the Battle of Langemarck three months earlier.
Tunnel Trench is so called because it has a tunnel 30 or 40 feet below ground along its entire length, with staircase access from the upper level every 25 yards. The entire tunnel has electric lighting, and side chambers provide storage space for bunks, food, and ammunition. Demolition charges are set that can be triggered from the German rear in order to prevent the defences from falling into British hands.
The 16th (Irish) Division, attacking on a three-brigade front, is assigned the task of capturing a 2,000-yard section of the trench network. On the right flank of the Irishmen, 3rd Division’s 9th Brigade is detailed to capture an additional 800 yards. One unusual feature of the attack is that there is to be no preliminary bombardment as surprise is the key to the success of the operation. Once the assault begins, however, 16th (Irish) Division’s artillery, reinforced with guns from the 34th Division, is to open a creeping barrage upon the German positions.
The morning of the advance, November 20, is overcast, with low visibility. At 6:20 a.m., the Divisional 18 pounder-field guns open fire, and the leading assault companies spring from their jump-off positions. At the same time, Stokes mortars begin to lay a smoke barrage upon the German trenches in imitation of a gas attack. This deception proves successful, as many German troops don cumbersome gas masks and retreat to the underground safety of the tunnel, thus leaving the exposed portion of the trench undefended.
On the left flank, the attack of the 49th Brigade is launched by 2nd Royal Irish Regiment and 7/8th Royal Irish Fusiliers. They quickly cross the 200 yards of no-man’s-land and reach the enemy frontline just as the barrage lifts. Resistance above ground is minimal, and storming parties began the task of flushing the Germans from the tunnel with Mills bombs and bayonets.
Once the tunnel is secure, sappers, acting on information obtained by 7th Leinster Regiment’s intelligence officer, cut the leads connecting the demolition charges. Supporting companies then press on to capture Tunnel Support Trench, while Divisional support units rapidly wire and made secure the new defensive front in anticipation of German counterattacks.
Only on the extreme left flank does 49th Brigade encounter any serious opposition. In this sector, Company “B” of the 7/8th Royal Irish Fusiliers suffers heavy losses inflicted by concentrated machine gun fire from Mebus Flora. Nearly one-hour elapses before resistance from this strong point can be overcome.
In the centre, 10th and 2nd Royal Dublin Fusiliers head the attack of the 48th Brigade. The advance here is so rapid that the Irish find many Germans still wearing gas masks and unable to fight. Two more Mebus, Juno and Minerva, are stormed and many more prisoners taken, particularly by 10th Royal Dublin Fusiliers which captures 170 Germans.
After capturing their assigned section of Tunnel Trench, two companies of Rangers press forward to assault the strong points known as Mars and Jove. The Division had learned from the disastrous frontal attack made at Langemarck, and so the Rangers work around to the rear before pressing home with the bayonet.
Unfortunately, 3rd Division fails in its attempt to capture the trench network immediately to the right of 16th (Irish) Division, and the flank of the Connaught Rangers is thus exposed to a savage counterattack. The Rangers ferociously engage the Germans and use captured “potato masher” grenades brought up from the tunnel to great effect. Eventually, overwhelming numbers begin to tell, and “A” Company is forced to yield Jove and fall back upon “B” Company, which is holding Mars.
These two isolated companies doggedly hold their ground for several hours. The situation only improves when the Divisional pioneer battalion, the 11th Hampshire Regiment, digs a communication trench across the fire-swept no-man’s-land, thereby allowing the support companies of the Rangers to come to the aid of their comrades. The front is finally stabilised three days later when 7th Leinster Regiment recaptures and consolidates Jove and successfully assaults the untaken section of Tunnel Trench.
On the first day of the Battle of Cambrai, General Byng’s eight attacking Divisions achieve complete surprise and pierce the Hindenburg Line, driving the Germans back four miles toward Cambrai itself. Having captured 8,000 prisoners and 100 guns for the loss of only 5,000 British casualties, it is small wonder that church bells are sounded in celebration in Britain for the first time during the war.
Unfortunately, Byng lacks sufficient reserves to exploit, or consolidate his success, and German counterattacks, launched by some 20 Divisions, recover most of the lost ground. Although the battle ultimately ends in failure for the British, the willingness to employ new weaponry and tactics at Cambrai and during the diversionary assault upon Tunnel Trench, points the way to the final victory in 1918.
Although the capture of Tunnel Trench contributes greatly to the early success at Cambrai, it proves costly as VI Corps suffers 805 casualties. Most of these occur close to Jove Mebus, where the Connaught Rangers had engaged the enemy in hand-to-hand combat.
Perhaps an idea of the ferocious nature of this form of trench warfare can be gleaned from Father William Doyle, chaplain of the 8th Royal Irish Fusiliers, who once remarks, “We should have had more prisoners, only a hot-blooded Irishman is a dangerous customer when he gets behind a bayonet and wants to let daylight through everybody.”
(From: “Tunnel Trench: 16th (Irish) Division Clears the Way at Cambrai,” by Kieron Punch, posted by The Wild Geese, http://www.thewildgeese.irish, January 18, 2013 | Pictured: Troops from the Royal Irish Regiment about to go into action at Cambrai)
On September 19, 1863, the 5th Confederate Infantry, consisting of a large number of Irish from Memphis, fight in one of the bloodiest battles of the American Civil War at Chickamauga, Georgia. One of the commanders is Cork-born Patrick Cleburne whom historians universally recognize as one of the most capable officers on either side during the awful conflict, although Chickamauga might not have been his finest hour. Cleburne is known as the “Stonewall of the West.” He is one of six Confederate generals to die in the Battle of Franklin.
After his successful Tullahoma campaign, Rosecrans renews the offensive, aiming to force the Confederates out of Chattanooga. In early September, he consolidates his forces scattered in Tennessee and Georgia and forces Bragg’s army out of Chattanooga, heading south. The Union troops follow it and brush with it at Davis’s Cross Roads. Bragg is determined to reoccupy Chattanooga and decides to meet a part of Rosecrans’s army, defeat it, and then move back into the city. On September 17 he heads north, intending to attack the isolated XXI Corps. As Bragg marches north on September 18, his cavalry and infantry fight with Union cavalry and mounted infantry, which are armed with Spencer repeating rifles. The two armies fight at Alexander’s Bridge and Reed’s Bridge, as the Confederates try to cross the West Chickamauga Creek.
Fighting begins in earnest on the morning of September 19. Bragg’s men strongly assault but cannot break the Union Army line. The next day, Bragg resumes his assault. In late morning, Rosecrans is misinformed that he has a gap in his line. In moving units to shore up the supposed gap, Rosecrans accidentally creates an actual gap directly in the path of an eight-brigade assault on a narrow front by Confederate Lieutenant GeneralJames Longstreet, whose corps has been detached from the Army of Northern Virginia. In the resulting rout, Longstreet’s attack drives one-third of the Union Army, including Rosecrans himself, from the field.
Union Army units spontaneously rally to create a defensive line on Horseshoe Ridge (“Snodgrass Hill“), forming a new right wing for the line of Major General George H. Thomas, who assumes overall command of remaining forces. Although the Confederates launch costly and determined assaults, Thomas and his men hold until twilight. Union forces then retire to Chattanooga while the Confederates occupy the surrounding heights, besieging the city.
Thomas withdraws the remainder of his units to positions around Rossville Gap after darkness falls. The Army of Tennessee camps for the night, unaware that the Union Army has slipped from their grasp. Bragg is not able to mount the kind of pursuit that would be necessary to cause Rosecrans significant further damage. Many of his troops had arrived hurriedly at Chickamauga by rail, without wagons to transport them, and many of the artillery horses had been injured or killed during the battle. The Tennessee River is now an obstacle to the Confederates and Bragg has no pontoon bridges to affect a crossing. Bragg’s army pauses at Chickamauga to reorganize and gather equipment lost by the Union Army. Although Rosecrans had been able to save most of his trains, large quantities of ammunition and arms are left behind.
Army of Tennessee historianThomas L. Connelly has criticized Bragg’s performance, claiming that for over four hours on the afternoon of September 20, he missed several good opportunities to prevent the Union escape, such as by a pursuit up the Dry Valley Road to McFarland’s Gap, or by moving a division to the north to seize the Rossville Gap or McFarland’s Gap via the Reed’s Bridge Road.
The battle is damaging to both sides in proportions roughly equal to the size of the armies: Union losses are 16,170 (1,657 killed, 9,756 wounded, and 4,757 captured or missing), Confederate losses are 18,454 (2,312 killed, 14,674 wounded, and 1,468 captured or missing). Among the dead are Confederate generals Benjamin Hardin Helm (husband of Abraham Lincoln‘s sister-in-law), James Deshler, and Preston Smith, and Union general William H. Lytle. Confederate general John Bell Hood, who had already lost the use of his left arm from a wound at Gettysburg, is severely wounded with a bullet in his leg, requiring it to be amputated. Although the Confederates are technically the victors, driving Rosecrans from the field, Bragg did not achieve his objectives of destroying Rosecrans or of restoring Confederate control of East Tennessee, and the Confederate Army suffers casualties that they can ill afford.
The largest and last major battle of the Confederate Heartland Offensive (Kentucky Campaign), the Battle of Perryville, pits Bragg’s Confederate army against General Don Carlos Buell‘s Union army. While Bragg wins the battle tactically, Confederate forces retreat from the battlefield and end the campaign, leaving Kentucky under Union control for the rest of the war.
In conjunction with General Edmund Kirby Smith, Bragg invades the Commonwealth of Kentucky in August 1862. While the Confederate forces see early success in the Battles of Richmond and Munfordville, they ultimately are unable to achieve their larger goal of taking control of the state. By late October, Bragg and Smith’s armies retreat into Tennessee.
On October 7, 1862, the 55,000-man Union Army of the Ohio under the command of General Buell converges on the small crossroads town of Perryville, Kentucky, in three columns. Union forces first skirmish with Confederate cavalry on the Springfield Pike before the fighting continues on Peters Hill as the gray-clad infantry arrive. Based on the intelligence Bragg receives from his cavalry, he believes that he faces only a small portion of General Buell’s army, not the main body. Both sides settle in for the coming battle that would decide the fate of Kentucky.
In the early morning hours of October 8, 1862, fighting begins around Peters Hill as a Union division advances up the pike searching for water, halting just before the Confederate line. General Bragg orders his army to attack the supposedly isolated Union force, but it is noon before the assault gets underway. By that point, a new Union Corps, numbering about 13,000, arrives on the field further to the Union left, led by General Alexander M. McCook. The Confederates shift their focus on this isolated corps, believing it to be the force they faced earlier in the morning.
In the afternoon, the Confederate attacks open up. Bragg plans to commit three divisions. Due to the surprise of the Confederates, the plan works. Many of the Union soldiers in McCook’s corps are inexperienced and have been in the service for less than three months. For over five hours, McCook’s corps struggle to survive.
Cleburne’s brigade enters the battle at about 3:40 p.m. Cleburne’s horse, Dixie, is killed by an artillery shell, which also wounds Cleburne in the ankle, but he keeps his troops moving forward. As they advance up the slope, they are subjected to Confederate artillery fire. Cleburne later surmises that the friendly fire is caused by his men wearing blue uniform trousers, which had been captured from Union soldiers at Richmond. On Cleburne’s left, Brigadier General Daniel W. Adams‘s brigade joins the attack against the 15th Kentucky, which had been reinforced by three companies of the 3rd Ohio. The Union troops retreat to the west toward the Russell House, McCook’s headquarters.
Meanwhile, the majority of the veteran Union forces are under orders not to engage because General Buell, only two miles from the main fight, cannot hear the battle raging. The acoustic shadow dissipates in the area’s rolling hills. In the fighting, the Confederates see much success all across the battlefield at places like Open Knob, where they capture seven Union cannons, Loomis’s Heights, and the H. P. Bottoms Farm. They manage to push back the Union corps over a mile from their positions. Eventually, the Union troops are reinforced by two brigades that stabilize their line, bringing the Confederate attack to a halt. Later, a Confederate brigade assaults the Union force on the Springfield Pike but is repulsed and falls back into Perryville. The Union forces pursue, and skirmishing occurs in the streets in the evening before dark.
After five hours of brutal fighting, on October 8, 1862, night falls upon the battlefield at Perryville. During the night, word finally reaches General Bragg of the true nature of what lay before him. Rather than facing a small Union force, he faces Gen. Buell’s entire army, the majority of which do not see combat. Weighing his options, Bragg, short of men and supplies, withdraws during the night and, after pausing at Harrodsburg, continues the Confederate retreat by way of the Cumberland Gap into East Tennessee.
Cleburne performs a final valuable service to the Confederate cause during Bragg’s retreat. He saves thousands of rifles, cartridges, and other supplies by using stragglers to drag the supply-wagon train to safety.
The Confederate offensive is over and the Union controls Kentucky.