The Capture of Bandon begins on February 23, 1689, when the town of Bandon, County Cork, is forcibly seized from its rebellious Protestant inhabitants by force of Irish Army troops under Justin McCarthy. The skirmishing at the town takes place during the early stages of the Williamite War in Ireland. The Jacobite success at Bandon helps suppress any chance of a general Munster uprising against the rule of James II similar to that which occurs in Ulster the same year. The slogan “No Surrender!” is believed to have been first used at Bandon and subsequently taken up, more famously, by the defenders at the Siege of Derry later in the year.
In 1685, the Catholic James II comes to the throne. This leads to a sharp reversal of government policy in Ireland, which had previously favoured the Protestant inhabitants. This is quickly changed by James’ representative Richard Talbot, 1st Earl of Tyrconnell. Under Talbot’s administration, the army and civil government are mostly purged of Protestants, who are replaced by Catholics. In Bandon, the previous town burgesses are replaced by Catholic nominees.
Talbot’s actions lead to a growing hostility amongst the Protestant inhabitants across the island toward the King and his Irish government. Bandon is a historic centre of Protestants, dating back to the Plantation of Munster in the Elizabethan era and is a natural focus of dissent against James’s rule. In 1688, a similar opposition in England leads to the Glorious Revolution, in which William III successfully invades with a Dutch Army. Many Protestants now believe William to be their rightful King while Catholics, and some Protestants, remain loyal to James. During the growing turmoil, many rural County Cork Protestants come to shelter in Bandon.
Fearing a potential outbreak of rebellion in Bandon will occur, the government sends a detachment of the Irish Army under Captain Daniel O’Neill to take the town. They reportedly enter on a Sunday morning while the inhabitants are attending church services. The following day, February 24, sometimes referred to as “Black Monday,” the townspeople rise and attack the soldiers. Various sources say between three and eight of the redcoats are killed and the remainder are driven out of the town. Using their captured weapons, the Protestants then make an effort to prepare Bandon to withstand an assault.
Having received word about the growing rebellion in the county, Talbot in Dublin has already dispatched six companies of infantry under Justin McCarthy, an experienced Irish Catholic soldier. Instead of immediately assaulting Bandon, McCarthy first seizes nearby Cork, another major centre of Protestants in the south of the country and clamps down on other potential dissidents. He then proceeds to Bandon with his troops, plus some cavalry and artillery. Although they had previously hung out a banner proclaiming “No Surrender,” the defenders negotiate a surrender in exchange for generous conditions. Despite the usual punishment for rebellion being death, the town corporation is fined £1,000 and the walls are ordered to be demolished.
The comparatively light terms imposed on the town are part of a wider attempt by King James to convince Protestants of his goodwill toward them. It angers more hardline Catholics, including McCarthy’s nephew, Donough MacCarthy, 4th Earl of Clancarty, who wants a harsher punishment for the rebels.
The fighting at Bandon is part of a succession of defeats of locally raised Protestant troops both across Munster (at Castlemartyr) and Ireland as a whole, with the Ulster-raised Army of the North suffering heavy defeats at the Break of Dromore and the Battle of Cladyford. The advance of the mainly Catholic Jacobite Army is halted by the successful Protestant defence of Enniskillen and Derry. The arrival of large-scale reinforcements under Frederick Schomberg and King William reverse the tide, and Dublin is captured following the Battle of the Boyne in 1690. The same year, Bandon is re-taken by Protestant forces following John Churchill, 1st Duke of Marlborough‘s successful Siege of Cork. The walls are not rebuilt, as they are becoming increasingly militarily obsolete.
O’Hare is born in St. Louis, Missouri on March 13, 1914, the son of Edward Joseph O’Hare and Selma Anna (née Lauth). He is of Irish and German descent. When his parents divorce in 1927, he and his sisters, Patricia and Marilyn, stay with their mother in St. Louis while their father moves to Chicago. His father is a lawyer who works closely with Al Capone before turning against him and helping convict Capone of tax evasion.
On Sunday evening, January 11, 1942, as O’Hare and other VF-3 officers eat dinner in the wardroom, the USS Saratoga is damaged by a Japanese torpedo while patrolling southwest of Hawaii. She spends five months in repair on the west coast, so VF-3 squadron transfers to the USS Lexington on January 31.
At 15:42 on February 20, 1942, a jagged vee signal draws the attention of the USS Lexington‘s radar operator. The contact is then lost but reappears at 16:25 forty-seven miles west. O’Hare is one of several pilots launched to intercept nine Japanese Mitsubishi G4M “Betty” bombers from the 4th Kōkūtai‘s 2nd Chutai. His squadmates shoot down eight bombers but he and his wingman, Marion “Duff” Dufilho, are held back in the event of a second attack.
At 16:49, the USS Lexington‘s radar picks up a second formation of “Bettys” from the 4th Kōkūtai’s 1st Chutai, only 12 miles out, on the disengaged side of the task force. With the majority of VF-3 still chasing the 2nd Chutai, only O’Hare and Dufilho are available to intercept.
O’Hare’s initial maneuver is a high-side diving attack from the formation’s starboard side employing deflection shooting. He manages to hit the outside Betty’s right engine and wing fuel tanks. When the stricken aircraft abruptly lurches to starboard, he switches to the next plane up the line. The plane catches fire, but the crew manages to extinguish the flames with a fire-extinguisher. This plane catches up with the group before bomb release.
With two “Bettys” out of formation, O’Hare begins his second firing pass, this time from the port side. His first target is the outside plane. His bullets damage the right engine and left fuel tank, forcing the pilot to dump his bombs and abort his mission. O’Hare then targets another plane which becomes his first definite kill.
As O’Hare begins his third firing pass, again from the port side, the remaining “Bettys” are nearing their bomb release point. He shoots down another plane, leaving the lead plane exposed. His concentrated fire causes the plane’s port engine nacelle to break free from its mountings and fall from the plane. The resulting explosion leaves a gaping hole in the left wing, and the plane falls out of formation.
Shortly afterward, O’Hare makes a fourth firing pass, likely against the plane that had caught fire during his initial pass but runs out of ammunition. Frustrated, he pulls away to allow the ships to fire their anti-aircraft guns. The four surviving bombers drop their ordnance, but all their 250 kg bombs miss. O’Hare believes he has shot down six bombers and damaged a seventh. Captain Frederick C. Sherman later reduces this to five, as four of the reported nine bombers are still overhead when he pulls off.
In fact, O’Hare destroys only three “Bettys.” One of the planes, however, is not yet finished. The command pilot regains enough control to level his damaged plane and attempts to crash it into USS Lexington. He misses and crashes into the water near the carrier at 17:12. Another three “Bettys” are damaged by O’Hare’s attacks. Two safely land at Vunakanau Airfield at 19:50, while the third becomes lost in a storm and eventually ditches at Simpson Harbour at 20:10.
On March 26, O’Hare is greeted at Pearl Harbor by a horde of reporters and radio announcers. Credited with shooting down five bombers, he becomes a flying ace, is selected for promotion to lieutenant commander, and becomes the first naval aviator to receive the Medal of Honor. With PresidentFranklin D. Roosevelt looking on, his wife Rita places the Medal around his neck. After receiving the Medal of Honor, he is described as “modest, inarticulate, humorous, terribly nice and more than a little embarrassed by the whole thing.”
O’Hare receives further decorations later in 1943 for actions in battles near Minamitorishima in August and subsequent missions near Wake Island in October.
O’Hare’s final action takes place on the night of November 26, 1943, while he is leading the U.S. Navy’s first-ever nighttime fighter attack launched from an aircraft carrier. During this encounter with a group of Japanese torpedo bombers, his Grumman F6F Hellcat is shot down. A radio message is sent out, but there is no response. The aircraft is never found. He is declared dead a year later, his widow Rita receiving her husband’s posthumous decorations, a Purple Heart and the Navy Cross on November 26, 1944. On January 27, 1945, the U.S. Navy names a Gearing-class destroyer, USS O’Hare (DD-889), in his honor.
On September 19, 1949, the Chicago-area Orchard Depot Airport is renamed O’Hare International Airport, six years after O’Hare perished. A Grumman F4F Wildcat, in a livery identical to the aircraft flown by O’Hare, is on display in Terminal 2. The display is formally opened on the seventy-fifth anniversary of his Medal of Honor flight.
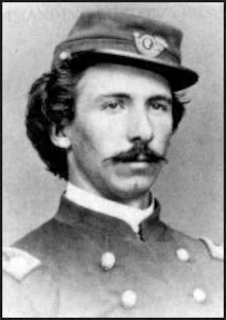
(Pictured: Lieutenant Edward H. “Butch” O’Hare, USN, circa April-May 1942, official U.S. Navy photograph, now in the collections of the National Archives)
The assault focuses on the English fort which sits at a bridge on the River Blackwater, marking the border between Counties Tyrone and Armagh. It is built by Walter Devereux, 1st Earl of Essex, in 1575 as an outpost of English military strength in the heart of Gaelic Ulster, but also to secure the power of the main Irish ally in the region, Hugh O’Neill, Baron of Dungannon. The fort is composed of a square earthwork bawn “twelve score yards in circuit” reinforced by two bulwarks and punctuated with gun loops in its ramparts. In one corner stands a wooden tower, four stories tall, topped with a wooden walkway and a slate-covered building. It is accessed by two doors, one leading out onto the ramparts, another leading to a cellar. Each story has defensive firing loops, also known as spike holes. This tower overlooks a road and bridge across the river. At the other side of the river, on the Tyrone side, is a stone tower. The stone tower controls access to the bridge, as the road runs through it via large wooden doors.
Hugh O’Neill, Lord of Tyrone, is thought an ally of the English Crown and he is supported by the English authorities in Dublin as a counterweight to the power of other native lords in Ulster such as Turlough Lynagh O’Neill. However, encroachment by English authorities on the liberties of the native Irish lords in Ulster during the 1580s and early 1590s causes O’Neill to create an alliance of Irish lords, which look to throw off English rule with the help of Philip II of Spain. From April 1593, O’Neill orchestrates a proxy war against the English using Hugh Maguire, Lord of Fermanagh, and Hugh Roe O’Donnell, Lord of Tyrconnell. They engage the English in the west of Ulster while O’Neill, outwardly still loyal to the Crown, strengthens his power base in Ulster and subdues the Crown’s Irish allies in the north. The Irish lay siege to Enniskillen Castle and defeat an English force sent to relieve it.
O’Neill’s alliance is not limited to Ulster as he is allied to Fiach McHugh O’Byrne in Leinster. He has come under increasing pressure from Lord DeputyWilliam Russell‘s military expeditions into the Wicklow Mountains. In desperation, Fiach McHugh asks that Tyrone offer help or at least raid the northern Pale to draw Russell out of Wicklow. O’Neill requests a meeting with Russell to discuss how to proceed but this is dismissed by the Lord Deputy as a ploy to draw him out of O’Byrne’s lands. Therefore, to help O’Byrne, O’Neill makes his first open move against the Crown.
On the morning of Sunday, February 16, 1595, Art MacBaron O’Neill approaches the fort from the direction of Armagh with 40 men, escorting what appears to be two prisoners. As they cross the bridge one of the English warders notices the match cords of the Irishmen’s matchlock calivers are lit, a sign that they are ready to fire. The English open fire and MacBaron’s men force their way into the stone tower, but the English withdraw to the upper stories and prevent the Irish from taking the tower. Meanwhile, on the other side of the river, 200 Irish soldiers sweep over the earth ramparts and take the bawn. The English soldiers and their families retreat to the wooden tower. Defensive fire from within keeps the Irish back and twice the warders thwart MacBaron’s attempts to burn the position. Fifteen of MacBaron’s men are killed attempting to storm the towers, and eight more later die of their wounds. The stalemate lasts until five o’clock in the evening when MacBaron calls for a ceasefire. He offers the garrison terms for their surrender. The English, led by Edward Cornwall, are critically low on ammunition but still prevaricate until MacBaron threatens to burn the fort to the ground with all in it. The ward’s surrender is agreed and MacBaron guarantees their safe passage to Newry.
The loss of the fort is doubtless a military setback for the Crown, but of more significance is the presence of the Earl of Tyrone in person. According to the English commander, O’Neill arrives after the surrender and is outraged at the losses suffered in taking the fort and is angry that the defenders had not been executed. After the English soldiers and their families leave, O’Neill looks on as the bridge is demolished and the fort’s defence slighted. Up until this point there is no concrete proof that O’Neill was active in the attacks by Maguire and O’Donnell in the west of Ireland. Now there is indisputable proof that the Crown was at war with O’Neill.
(Pictured: The Blackwater Fort at present-day Blackwatertown in County Armagh, built by the Earl of Essex during a foray into Ulster in 1575 and captured and destroyed by the Irish in 1595. This pen and ink sketch measures 22½ by 16½ inches and is dated March 27, 1587.)
During the first day of the battle, the Federal gunboats and the forts on shore engage in a gun battle, with occasional contributions from the Mosquito Fleet. Late in the day, Burnside’s soldiers go ashore unopposed. They are accompanied by six howitzers manned by sailors. As it is too late to fight, the invaders go into camp for the night.
On the second day, February 8, the Union soldiers advance but are stopped by an artillery battery and accompanying infantry in the center of the island. Although the Confederates believe that their line is safely anchored in impenetrable swamps, they are flanked on both sides and their soldiers are driven back to refuge in the forts. The forts are taken in reverse. With no way for his men to escape, Col. Shaw surrenders to avoid pointless bloodshed.
Aside from the men who are taken into captivity, casualties are rather light by American Civil War standards. The Federal forces lose 37 killed, 214 wounded, and 13 missing. The Confederates lose 23 killed, 58 wounded, and 62 missing.
Roanoke Island remains in Union control for the rest of the war. Immediately after the battle, the Federal gunboats pass the now-silent Confederate forts into Albemarle Sound and destroy what is left of the Mosquito Fleet at the Battle of Elizabeth City. Burnside uses the island as staging ground for later assaults on New Bern and Fort Macon, resulting in their capture. Several minor expeditions take other towns on the sounds. The Burnside Expedition ends in July, when its leader is called to Virginia to take part in the Richmond campaign.
After Burnside leaves, North Carolina ceases to be an active center of the war. With only one or two exceptions, no notable military actions take place until the last days of the conflict, when the Second Battle of Fort Fisher closes Wilmington, the last open port in the Confederacy.
Guiney is the second and eldest surviving son of James Roger Guiney, who is descended from Jacobites, and Judith Macrae. His father, impoverished after a failed runaway marriage, brings with him on his second voyage to New Brunswick his favourite child Patrick, not yet six years old. After some years, his mother and younger brother, William, rejoin her husband, recently crippled by a fall from his horse. They settle in Portland, Maine. The young Guiney works as a wheel boy in a rope factory, and at the age of fourteen apprenticed to a machinist in Lawrence, Massachusetts, but stays only a year and a half before returning to Portland.
Guiney hopes to better himself through education and attends the public grammar school. He matriculates at the College of the Holy Cross in Worcester, Massachusetts. His depleting finances cause him to leave after about a year, despite the fact that the college president offers to make some arrangement for him to stay, which his honor would not allow him to accept. His book-loving father having meanwhile died, he goes to study for the Bar under Judge Walton, and is admitted in Lewiston, Maine, in 1856, taking up the practice of criminal law.
Familiar with the manual of arms, Guiney enlists for example’s sake as a private, refusing a commission from GovernorJohn A. Andrew until he has worked hard to help recruit the 9th Massachusetts Infantry Regiment. By June 1861, he is a captain. In July 1862, the first colonel having died from a wound received in action, Lieutenant Colonel Guiney succeeds him to the command. He wins high official praise, notably for courage and presence of mind at the Battle of Gaines’ Mill in Hanover County, Virginia. Here, after three successive color-bearers had been shot down, he himself reportedly seizes the flag, throws aside coat and sword-belt, rises white-shirted and conspicuous in the stirrups, inspires a final rally, and turns the fortune of the day.
The 9th Massachusetts is present at Gettysburg, Pennsylvania, in second brigade first division V Corps on July 1, 1863. Col Jacob B. Sweitzer the brigade commander, detaches Guiney’s regiment for picket duty. Consequently, the regiment misses the second day’s fighting at the Battle of Gettysburg.
In 1864, through the Battle of the Wilderness, Guiney frequently has been in command of his brigade, the second brigade, first division, V Corps. After many escapes from dangerous combats without serious injury, he is shot in the face by a sharpshooter at the Battle of the Wilderness on May 5, 1864. The Minié ball destroys his left eye, and inflicts, it is believed, a fatal wound. During an interval of consciousness, however, he insists on an operation which saves his life. He is honorably discharged and mustered out of the U.S. Volunteers on June 21, 1864, just before the mustering out of his old regiment.
On February 21, 1866, PresidentAndrew Johnson nominates Guiney for the award of the honorary grade of brevetbrigadier general, to rank from March 13, 1865, for gallant and meritorious services during the war. The U.S. Senate confirms the award on April 10, 1866.
Kept alive for years by nursing, Guiney runs unsuccessfully for the United States Congress on a sort of “Christian Socialist” platform, is elected assistant district attorney (1866–70), and acts as consulting lawyer (no longer being able to plead) on many locally celebrated cases.
Guiney’s last exertions are devoted to the defeat of the corruption and misuse of the Probate Court of Suffolk County, Massachusetts, of which he had become registrar (1869–77). He dies suddenly on March 21, 1877, in Boston and is found kneeling against an elm in the little park near his home. General Guiney is Commandant of the Loyal Legion, Major-General Commandant of the Veteran Military League, member of the Charitable Irish Society of Boston, and one of the founders and first members of the Catholic Union of Boston. He also publishes some literary criticism, a few graphic prose sketches and some verse.
O’Mahony comes from a distinguished Munster family. One brother, Dermod, had been a colonel and another, Daniel, a captain in the Irish Jacobite army that left Limerick for the continent in 1691 in what is known as the Flight of the Wild Geese. Daniel is also a brother-in-law of another famous officer of the Irish Brigade of France, the Marshal James FitzJames, 1st Duke of Berwick. Holding the rank of major, O’Mahony achieves great fame for his part in the Battle of Cremona, where the Irish Brigade foils Prince Eugene of Savoy‘s surprise attack on the city in 1702, and has steadily risen through the ranks.
During the War of Spanish Succession, many officers and units of the Irish Brigade serve in Spain fighting the Allies’ attempt to place Archduke Charles, son of Habsburg (Austrian) Emperor Leopold I, on the Spanish throne. In the early part of 1707, O’Mahony commands an unsuccessful attempt to capture the town of Alcoy with a force of about 1,800 men. On January 2, 1708, he arrives at the gates of the city again, but this time he commands a force of over 6,000, including the Irish battalions of Dillon, Berwick and Bourke.
By January 4, O’Mahony’s six guns have breached the walls of Alcoy, but the Allied garrison fights well and repulses attempts to take it on the 5th and 7th with much loss of life on the Franco-Spanish side. With no relief in sight, the garrison’s situation is hopeless. O’Mahony accepts the garrison’s surrender on January 9.
Daniel O’Mahony is one of the finest commanders of all The Wild Geese. After Alcoy he serves in Sicily and then back in Spain again. He is created a Count of Castile and promoted to lieutenant general. One of the Count’s sons, James, also reaches the rank of lieutenant general in the Spanish army and the other, Dermod, becomes the Ambassador of Spain to Austria.
(Pictured: The flag of the Duke of Berwick’s regiment of the Irish Brigade of France)
He serves in the American Revolutionary War (1775–81), first seeing action at the Battles of Lexington and Concord and the Battle of Bunker Hill. He is rewarded with an English peerage in 1783. He succeeds his father as Earl of Moira in 1793. When the Whigs come to power in 1806, he is appointed Master-General of the Ordnance, a post he resigns on the fall of his party in 1807. Taking an active part in the business of the House of Lords, he belongs to the circle of the Prince of Wales (later George IV), through whose influence he is appointed Governor-General of India, on November 11, 1812. He lands at Calcutta (Kolkata) and assumes office in October 1813. Facing an empty treasury, he raises a loan in Lucknow from the nawab-vizier there and defeats the Gurkhas of Nepal in 1816. They abandon disputed districts, cede some territory to the British, and agree to receive a British resident (administrator). For this success, in 1817 he is raised to the rank of Marquess of Hastings together with the subsidiary titles Viscount Loudoun and Earl of Rawdon.
He then has to deal with a combination of Maratha powers in western India whose Pindaris, bands of horsemen attached to the Maratha chiefs, are ravaging British territory in the Northern Sarkars, in east-central India. In 1817, he offers the Marathas the choice of cooperation with the British against the Pindaris or war. The Peshwa, the Prime Minister of the Maratha Confederacy, the raja of Nagpur, and the army under Holkar II, ruler of Indore, chose war and are defeated. The Pindari bands are broken up, and, in a settlement, the Peshwa’s territories are annexed, and the Rajput princes accept British supremacy. By 1818 these developments establish British sovereignty over the whole of India east of the Sutlej River and Sindh. Rawdon-Hastings also suppresses pirate activities off the west coast of India and in the Persian Gulf and the Red Sea. In 1819, Sir Stamford Raffles, under his authority, obtains the cession by purchase of the strategic island of Singapore.
In internal affairs, Rawdon-Hastings begins the repair of the Mughal canal system and brings the pure water of the Yamuna River (Jumna) into Delhi, encourages education in Bengal, begins a process of Indianization by raising the status and powers of subordinate Indian judges, and takes the first measures for the revenue settlement of the extensive “conquered and ceded” provinces of the northwest.
Rawdon-Hastings’s competent administration, however, ends under a cloud because of his indulgence to a banking house. Though he is cleared of any corrupt motive, the home authorities censure him. He resigns and returns to England in 1823, receiving the comparatively minor post of Governor of Malta in 1824. He dies at sea off Naples on November 28, 1826, aboard HMS Revenge, while attempting to return home with his wife. She returns his body to Malta, and following his earlier directions, cuts off his right hand and preserves it, to be buried with her when she dies. His body is then laid to rest in a large marble sarcophagus in Hastings Gardens, Valletta. His hand is eventually interred, clasped with hers, in the family vault at Loudoun Kirk.
In 1828, two years after Rawdon-Hastings’s death, members of the India House, to make some amends for their vote of censure, give £20,000 to trustees for the benefit of Hastings’s son.
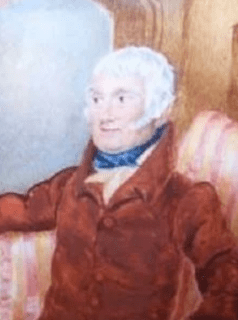
(Pictured: “Portrait of Francis Rawdon, 2nd Earl of Moira, later 1st Marquess of Hastings (1754 – 1826)” possibly by Martin Archer Shee, oil on canvas, National Gallery of Ireland)
When the war breaks out, one of the Boers’ early targets is the diamond-mining centre of Kimberley, which stands not far from the point where the borders of the Boer republics of the Transvaal and the Orange Free State, and the British-controlled Cape Colony meet. Although their forces surround the town, they do not press home any immediate assault. Nor do they attempt to cross the Orange River on this front to invade Cape Colony.
Meanwhile, British reinforcements are on their way to South Africa. Their commander, General Sir Redvers Buller, detaches the 1st Division under Lieutenant General Lord Methuen to relieve the Siege of Kimberley. This decision is made partly for reasons of prestige, as the capture of Kimberley, which contains the famous Imperialist and former Prime Minister of Cape Colony, Cecil Rhodes, would be a major propaganda victory for the British.
During November, Methuen’s force advances north along the Western Cape Railway. They fight and win two engagements against Boers from the Orange Free State under General Prinsloo at the Battle of Belmont and at the Battle of Graspan. At least one American, Lance Corporal Hollon Bush of the 7th Company, First Battalion Coldstream Guards is present and wounded at the Battle of Modder River. His journey to enlist from departure in New Orleans to England is not without many pitfalls before beginning service at the Tower of London, then on to Gibraltar and South Africa.
Methuen’s force consists of two infantry brigades, the Guards Brigade under Major-General Sir Henry Edward Colville and the 9th Brigade under Major-General Reginald Pole-Carew, two mounted regiments, three batteries of field artillery (18th, 62nd and 75th) and four guns of the Naval Brigade. Further reinforcements are arriving up the railway.
The British cavalry (the 9th Queen’s Royal Lancers and a unit recruited in Cape Town, Rimington’s Guides) make some attempts to scout the ground ahead of the army but fail entirely to detect General Koos de la Rey‘s trenches and other preparations. For example, the Boers had whitewashed stones on the veld or had placed biscuit tins as range markers. At 4:30 a.m. on November 28, Methuen’s force rouses itself, deploys into line and begins advancing toward the Modder River, with no plans other than to cross the river before having breakfast on the far side.
As the British troops come within 1,200 yards of the river, Methuen remarks to Colville, “They’re not here.” Colville replies, “They’re sitting uncommonly tight if they are.” At this point the Boers open fire. Most of the British troops are forced to throw themselves flat. Some try to advance in short rushes but can find no cover on the veld. Few British troops get closer than 1,000 yards to the Boers. The Guards try to outflank the Boer left but are unable to ford the Riet River. The British guns pound the buildings near Modder River Station and the line of poplar trees which mark the north bank of the Modder River, and entirely miss the enemy trenches on the south bank. Meanwhile, the Boer guns maintain a galling fire and are kept in action by repeatedly moving their positions.
The battle becomes a day-long stalemate. Most of the British infantry lay prone on the veld, tortured by heat and thirst, but safe from enemy fire unless they move. Many stoically smoke pipes or even sleep. Methuen gallops about the field trying to renew the advance and is himself wounded. At midday, some of Pole-Carew’s 9th Brigade find the open Boer right flank at Rosmead drift (ford) downstream. British infantry infiltrates across the ford and at about 1:00 p.m. drives the Boers out of Rosmead. The attack is disjointed and suffers casualties when a British field artillery battery which had just arrived on the field shells them by mistake. By nightfall, De la Rey has driven them back into a small insecure bridgehead.
Nevertheless, the Boers fear that they are now vulnerable to being outflanked and withdraw during the night.
Methuen reports that the battle had been “one of the hardest and most trying fights in the annals of the British army.” Although casualties are not cripplingly heavy (between 450 and 480), mainly because the Boers opened fire prematurely, it is clear that any simple frontal attack by infantry only against an enemy using bolt action rifles, is effectively impossible. The British are forced to pause for ten days, to evacuate their casualties, receive further reinforcements and repair their lines of communications. The delay allows the Boers to construct the entrenchments which they are to defend in the Battle of Magersfontein.
On the Boer side, there are about 80 casualties, including, Adriaan, the eldest son of Koos de la Rey, mortally wounded by a shell.
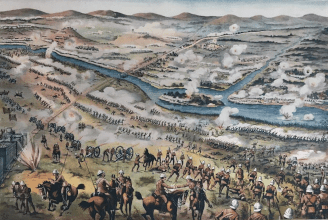
(Pictured: An illustration of the Battle of Modder River during the Second Boer War. This illustration is more dramatic than the actual battle, and is meant to amplify the British side of the war, Bacon’s South Africa War Prints, G. W. Bacon & Co. London)
Needham then holds a staff appointment in Ireland, and during the Irish Rebellion of 1798 commands the crown forces at the Battle of Arklow on June 9, 1798. He places his approximately 1,600 troops in strong positions at the eastern and western ends of the town, where they can sweep the Arklow Rock Road and the Coolgreany Road with fire if the rebels approach along them. Ultimately, this is what the United Irish force, estimated at 5,000–9,000 strong, does, repeatedly attacking Needham’s right flank, which is in fact his strongest position. Estimates of the United Irish dead range from 200 to 1,000, and the failure of the attack ensures that the rebels lose the military initiative. He is also present at the Battle of Vinegar Hill on June 21, 1798, but his force arrives late, leaving a gap in the British line through which many rebels escape. This is later christened “Needham’s gap,” earning him the nickname of “the late General Needham” among his fellow officers.
Promoted to lieutenant-general in 1802, Needham is made colonel of the 5th Royal Veteran Battalion in 1804, entering House of Commons as MP for Newry in 1806. He is made full general in 1812, and, following the death of his two older brothers, succeeds as 12th Viscount Kilmorey in November 1818, resigning his parliamentary seat. On January 12, 1822, he is created 1st Earl of Kilmorey (Queen’s County) and Viscount Newry and Mourne. He dies on November 21, 1832, at the family seat, Shavington Hall, Shropshire, and is buried in St. Peter’s Church, Adderley.
Needham marries Anne Fisher, daughter of Thomas Fisher of Acton, Middlesex, on February 20, 1787. They have two sons, Francis Jack Needham, who succeeds as 2nd Earl, and the Hon. Francis Henry William Needham, lieutenant-colonel in the Grenadier Guards, and seven daughters. There are Needham letters in the Public Record Office (PRO), Kew, and in the Rebellion Papers in the National Archives of Ireland in Dublin.
At dawn on the morning of November 20, 1917, the 16th (Irish) Division of the British Army assaults an area of the German lines known as “Tunnel Trench,” named for an elaborate tunnel system that runs along it. The attack is meant as a diversion for the main attack, about eight miles to the southeast at Cambrai, France, where six infantry and two cavalry divisions of the British Expeditionary Force, with additional support from fourteen squadrons of the Royal Flying Corps, join the British Tank Corps in a surprise attack on the German lines.
By autumn 1917, three years into World War I, continuous shelling and lack of drainage has transformed the Ypres Salient, on the Western Front, into a waterlogged quagmire. In Ireland, meanwhile, a month earlier, Eamon de Valera becomes president of Sinn Féin and decides to push for an independent Irish republic. Despite the growing political turmoil at home, in France, on firm ground near the town of Cambrai, the British Army’s 16th (Irish) Division again proves to be formidable adversaries for the Germans.
According to the divisional historian, at Cambrai, the “swift and successful operation by 16th Division was a model of attack with a limited objective.” In addition to securing 3,000 yards of trench, 635 prisoners are captured from the German army’s 470th and 471st Regiments and 330 German bodies are counted in the trenches. More importantly, though, the mayhem caused by the diversionary assault contributes greatly to the initial success of the Cambrai offensive, though the offensive eventually sputters, dragging the war into 1918.
Cambrai becomes the field of operations when the British Commander-in-Chief, Field MarshalDouglas Haig, recognising that it is impossible to launch further military operations in the Ypres sector, seeks a new battlefield where he hopes success can be achieved before year’s end. Lieutenant ColonelJohn Fuller of the Tank Corps and GeneralJulian Byng, commander of the Third Army, recommend that a massed assault by 400 tanks should be mounted across the firm, chalky ground to the southwest of Cambrai. Haig adopts this proposal, confident that the tanks can punch a hole through the mighty Hindenburg Line and allow his underused Cavalry Divisions to break through to the enemy rear.
In order to create maximum confusion among the Germans, Sir Aylmer Haldane, commander of VI Corps, is ordered to stage a diversionary attack. The area selected for the assault is about eight miles to the northwest of Cambrai, where the British line passes through the villages of Bullecourt and Fontaine-lès-Croisilles. The units select to make this subsidiary attack are 3rd Army and 16th (Irish) Division.
The defences of the Hindenburg Line opposite VI Corps positions consists of Tunnel Trench, a heavily defended front-line trench, with a second, or support trench, some 300 yards behind. The whole area is scattered with concrete machine gun forts, or Mebus, similar to those that had decimated the 16th (Irish) Division at the Battle of Langemarck three months earlier.
Tunnel Trench is so called because it has a tunnel 30 or 40 feet below ground along its entire length, with staircase access from the upper level every 25 yards. The entire tunnel has electric lighting, and side chambers provide storage space for bunks, food, and ammunition. Demolition charges are set that can be triggered from the German rear in order to prevent the defences from falling into British hands.
The 16th (Irish) Division, attacking on a three-brigade front, is assigned the task of capturing a 2,000-yard section of the trench network. On the right flank of the Irishmen, 3rd Division’s 9th Brigade is detailed to capture an additional 800 yards. One unusual feature of the attack is that there is to be no preliminary bombardment as surprise is the key to the success of the operation. Once the assault begins, however, 16th (Irish) Division’s artillery, reinforced with guns from the 34th Division, is to open a creeping barrage upon the German positions.
The morning of the advance, November 20, is overcast, with low visibility. At 6:20 a.m., the Divisional 18 pounder-field guns open fire, and the leading assault companies spring from their jump-off positions. At the same time, Stokes mortars begin to lay a smoke barrage upon the German trenches in imitation of a gas attack. This deception proves successful, as many German troops don cumbersome gas masks and retreat to the underground safety of the tunnel, thus leaving the exposed portion of the trench undefended.
On the left flank, the attack of the 49th Brigade is launched by 2nd Royal Irish Regiment and 7/8th Royal Irish Fusiliers. They quickly cross the 200 yards of no-man’s-land and reach the enemy frontline just as the barrage lifts. Resistance above ground is minimal, and storming parties began the task of flushing the Germans from the tunnel with Mills bombs and bayonets.
Once the tunnel is secure, sappers, acting on information obtained by 7th Leinster Regiment’s intelligence officer, cut the leads connecting the demolition charges. Supporting companies then press on to capture Tunnel Support Trench, while Divisional support units rapidly wire and made secure the new defensive front in anticipation of German counterattacks.
Only on the extreme left flank does 49th Brigade encounter any serious opposition. In this sector, Company “B” of the 7/8th Royal Irish Fusiliers suffers heavy losses inflicted by concentrated machine gun fire from Mebus Flora. Nearly one-hour elapses before resistance from this strong point can be overcome.
In the centre, 10th and 2nd Royal Dublin Fusiliers head the attack of the 48th Brigade. The advance here is so rapid that the Irish find many Germans still wearing gas masks and unable to fight. Two more Mebus, Juno and Minerva, are stormed and many more prisoners taken, particularly by 10th Royal Dublin Fusiliers which captures 170 Germans.
After capturing their assigned section of Tunnel Trench, two companies of Rangers press forward to assault the strong points known as Mars and Jove. The Division had learned from the disastrous frontal attack made at Langemarck, and so the Rangers work around to the rear before pressing home with the bayonet.
Unfortunately, 3rd Division fails in its attempt to capture the trench network immediately to the right of 16th (Irish) Division, and the flank of the Connaught Rangers is thus exposed to a savage counterattack. The Rangers ferociously engage the Germans and use captured “potato masher” grenades brought up from the tunnel to great effect. Eventually, overwhelming numbers begin to tell, and “A” Company is forced to yield Jove and fall back upon “B” Company, which is holding Mars.
These two isolated companies doggedly hold their ground for several hours. The situation only improves when the Divisional pioneer battalion, the 11th Hampshire Regiment, digs a communication trench across the fire-swept no-man’s-land, thereby allowing the support companies of the Rangers to come to the aid of their comrades. The front is finally stabilised three days later when 7th Leinster Regiment recaptures and consolidates Jove and successfully assaults the untaken section of Tunnel Trench.
On the first day of the Battle of Cambrai, General Byng’s eight attacking Divisions achieve complete surprise and pierce the Hindenburg Line, driving the Germans back four miles toward Cambrai itself. Having captured 8,000 prisoners and 100 guns for the loss of only 5,000 British casualties, it is small wonder that church bells are sounded in celebration in Britain for the first time during the war.
Unfortunately, Byng lacks sufficient reserves to exploit, or consolidate his success, and German counterattacks, launched by some 20 Divisions, recover most of the lost ground. Although the battle ultimately ends in failure for the British, the willingness to employ new weaponry and tactics at Cambrai and during the diversionary assault upon Tunnel Trench, points the way to the final victory in 1918.
Although the capture of Tunnel Trench contributes greatly to the early success at Cambrai, it proves costly as VI Corps suffers 805 casualties. Most of these occur close to Jove Mebus, where the Connaught Rangers had engaged the enemy in hand-to-hand combat.
Perhaps an idea of the ferocious nature of this form of trench warfare can be gleaned from Father William Doyle, chaplain of the 8th Royal Irish Fusiliers, who once remarks, “We should have had more prisoners, only a hot-blooded Irishman is a dangerous customer when he gets behind a bayonet and wants to let daylight through everybody.”
(From: “Tunnel Trench: 16th (Irish) Division Clears the Way at Cambrai,” by Kieron Punch, posted by The Wild Geese, http://www.thewildgeese.irish, January 18, 2013 | Pictured: Troops from the Royal Irish Regiment about to go into action at Cambrai)